-
 Getting started
 -
 RVsitebuilder Overview
 -
 Creating Website
 -
 Website Blog
 -
 SEO
SEO -
 Website Email
 -
 Website Membership
 -
 RVsitebuilder Apps
 -
 Advanced
 -
 Website Management
 -
 Internationalization
 -
 Troubleshooting
Website Content
- Add new page
- Add content and font
- Content area design
- Insert blog widget
- Insert link to content and image
- Insert button
- Insert image
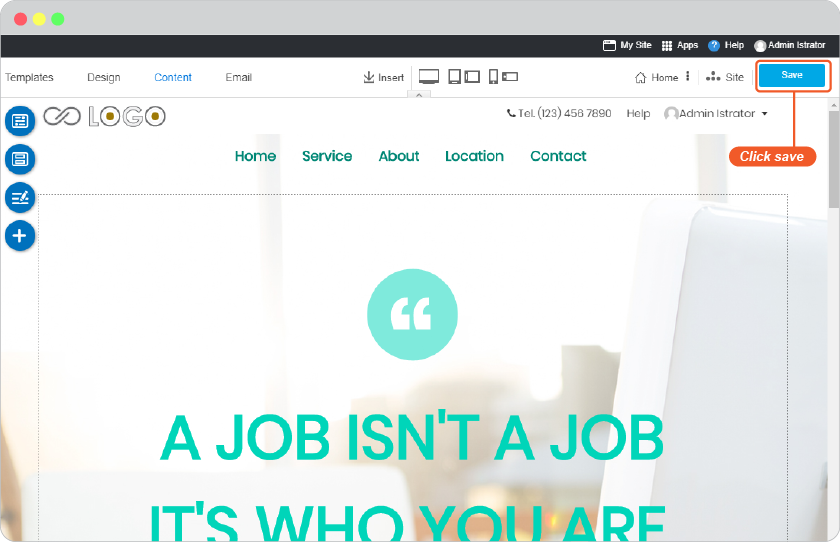
Edit content for your website is the most easiest and frequent activity you may enjoy. The Content Editor is the very first and an always place to welcome you after logging in.
At Content tab, you will always be at the new added page or the latest one you edit previously.
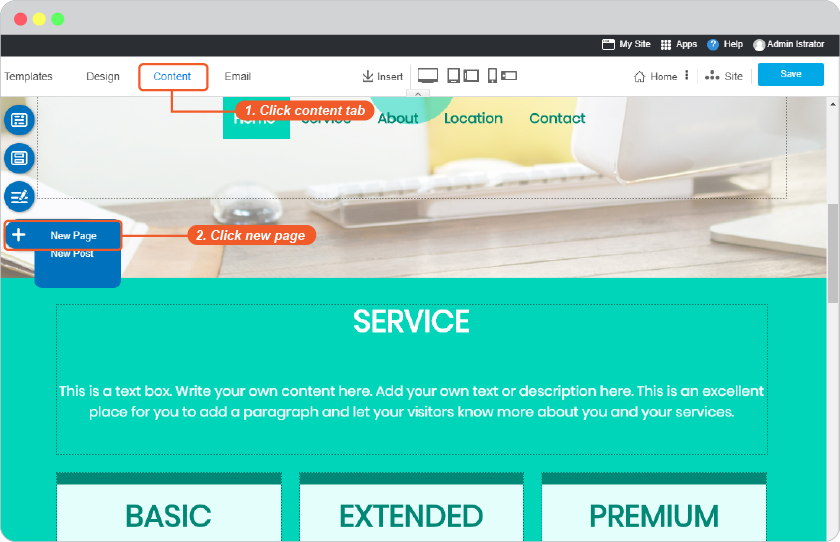
Add new page
Add new page
-
In Content editor, click "+" on floating menu, and select New Page.
-
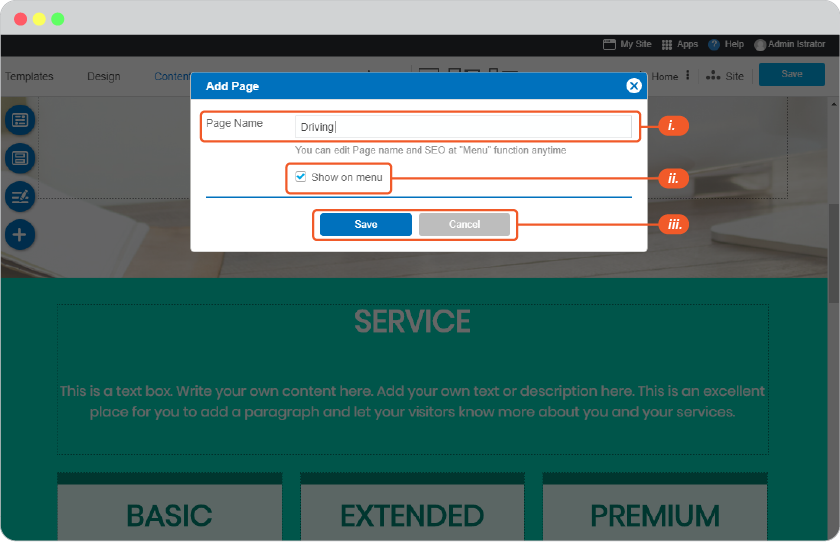
The "Add Page" panel appears;
- Page Name : Insert any name for this new page.
- "Show on menu" box : Check it to make this new page has its own Menu on website navigation. You can leave this unchecked if you don't want the page to be online, and point this page to a menu later.
-
Save : To add this page.
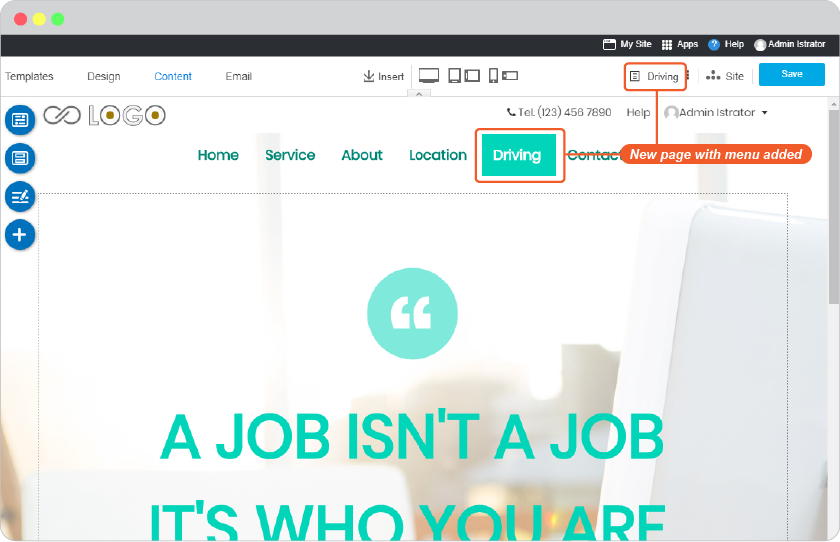
- a) Below is sample of the new added page with "Show on menu" box checked. The new content editor will be ready to work that you can see it on current page name on the Right Menu, and its Menu is right on the website navigation.
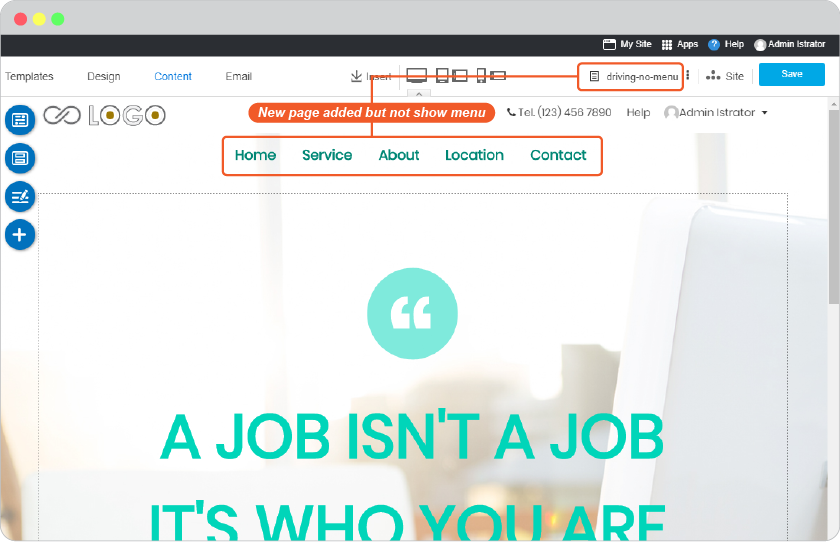
- b) Below is sample of the new added page with "Show on menu" box UNCHECKED. The new content editor will be ready to work that you can see it on current page name on the Right Menu. This page will not have its Menu on the website navigation. You can add Menu for this page later (next section).
-
You can start content for this page now.
Link page to a menu
-
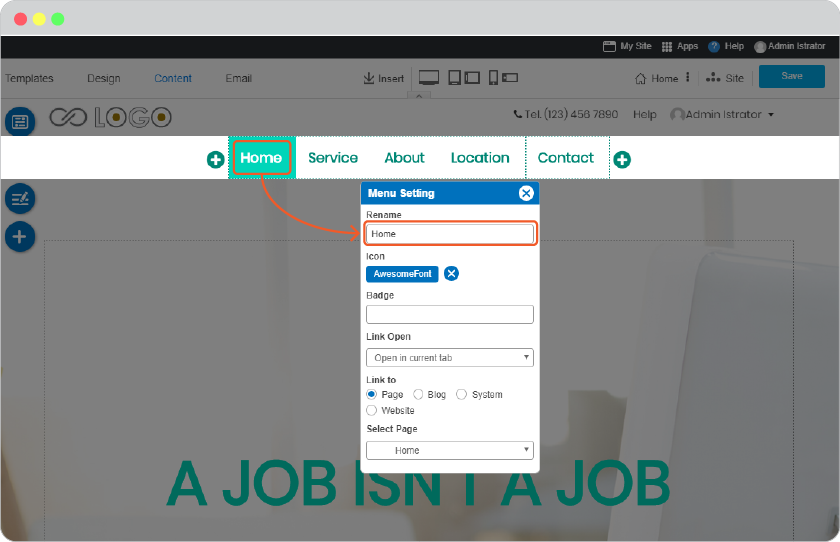
Link page to a current menu on navigation
-
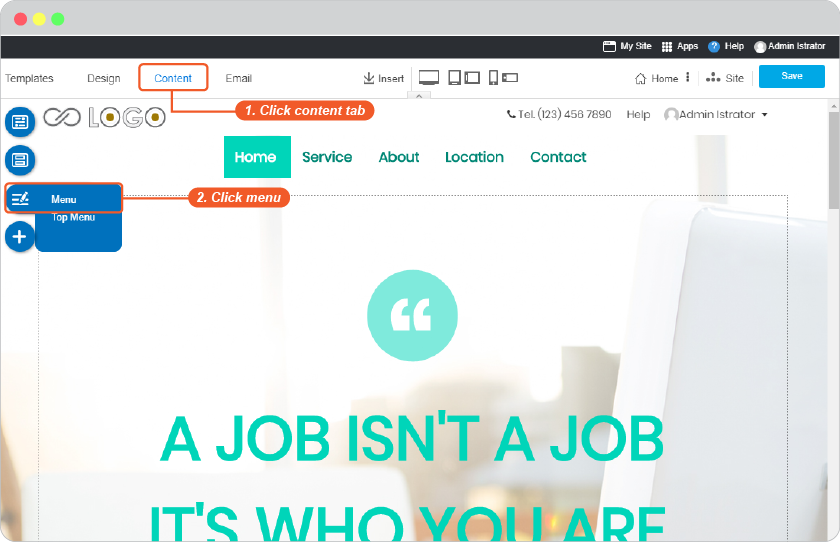
In Content editor, click "Menu" on floating menu, and select Menu.
-
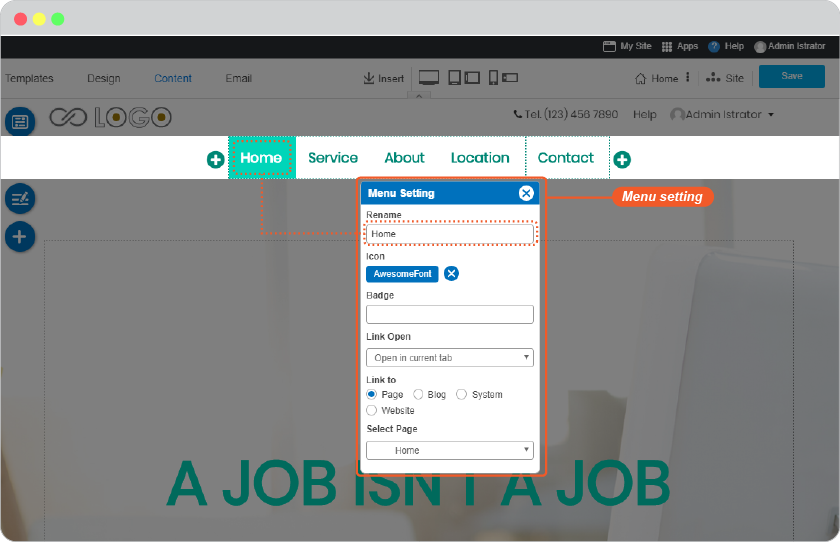
The "Menu Setting" panel appears, click on the Menu you want to link to a page.
-
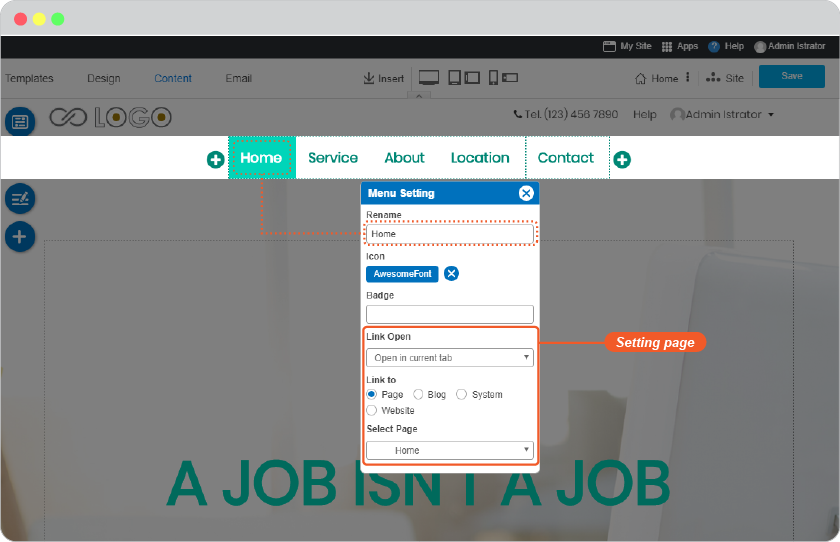
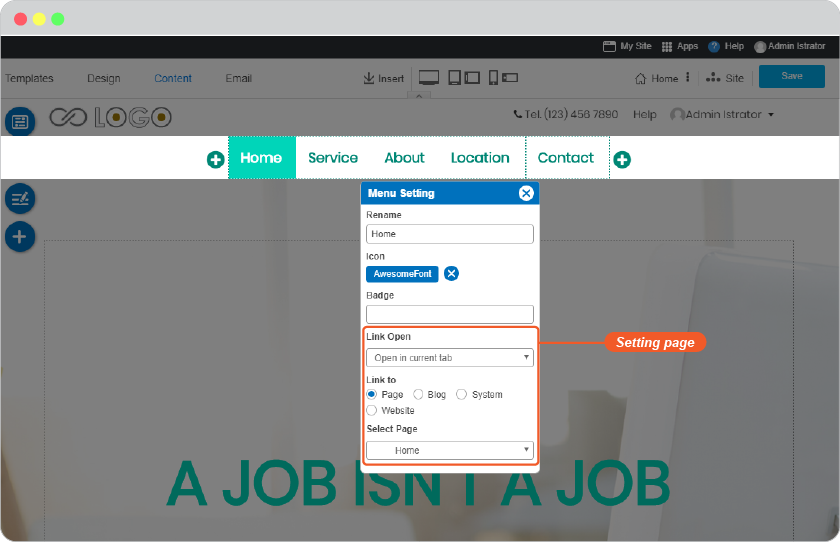
In "Menu Setting" panel, look at Link to part, select Page bullet. And select page name from Select Page part.
-
Close Menu Setting window, and Save it on Content edior page.
-
-
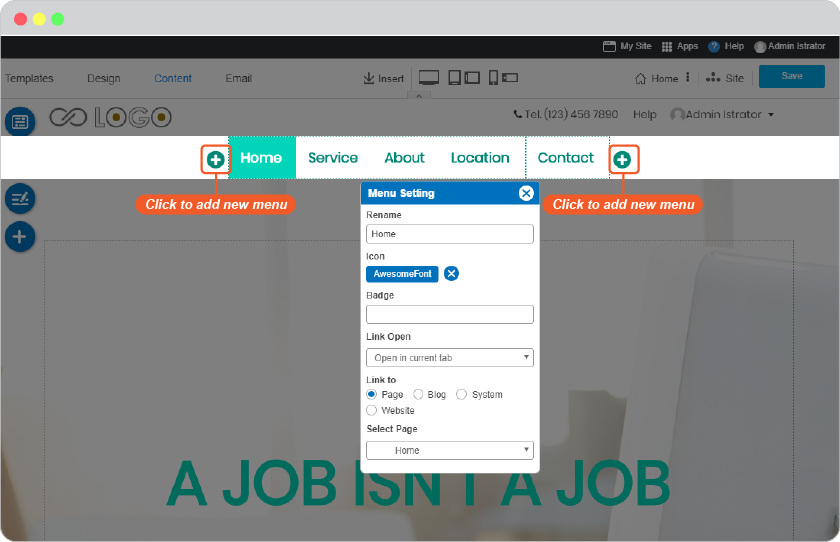
Link page to a new menu
-
In Content editor, click "Menu" on floating menu, and select Menu.
-
The "Menu Setting" panel appears. Click at "+" symbol on Website Navigation to add new menu.
-
The added menu information appears in "Menu Setting" panel.
-
In "Menu Setting" panel,look at Link to part, select Page bullet. And select page name from Select Page part.
-
Close Menu Setting window, and Save it on Content edior page.
-
Add content and font
RVsitebuilder 7 provides full pack of content tools you would want.
Once you place mouse on a text area, you can immediately start your content with our cool text tools.
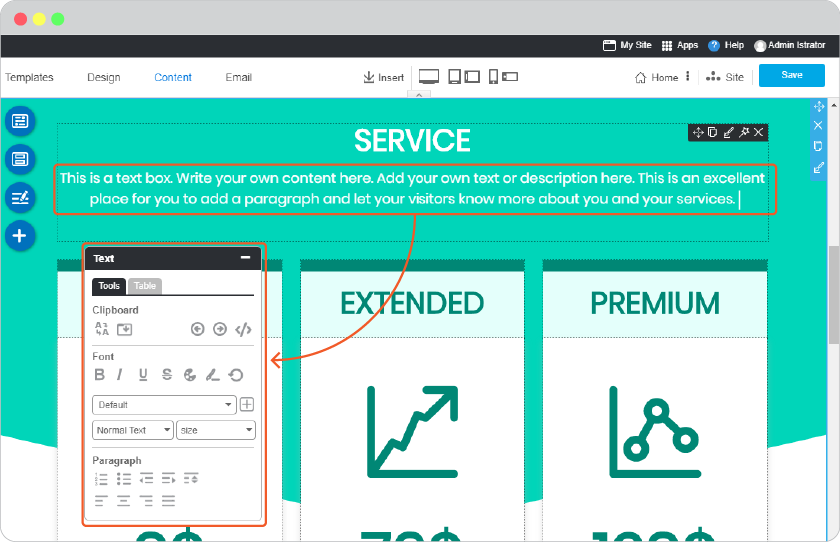
Text Tools

Clipboard
Paint format
The Paint Tool copies format from one place in your document to another. It's quite handy. RVsitebuilder lets you copy the format you've applied to a specific section of text to another section using the paint format tool. To use this tool, select the text that's formatted in the way that you want to copy
- Current cursor on format a line of text or cell in your desired appearance.
- Click the Paint Format icon.
- To apply this format to other text, simply highlight the text you want to apply the format to.
-
Clicking Paint Format icon again, it will lock the format into place and every piece of text clicked will change to the new format.

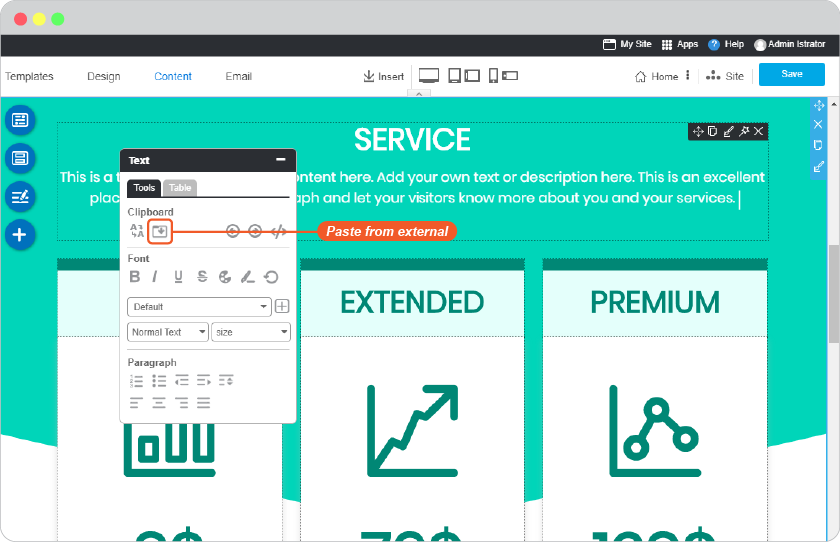
Paste from external
This will clean up HTML source code before pasting it into your document. Paste or drag content from Office documents, web pages and other programs into the box below (To paste use the keyboard shortcut, Ctrl + v on Windows or Command + v on a Mac). Please be patient, pasting from Office documents can take a considerable amount of time. When the paste is complete press Insert.
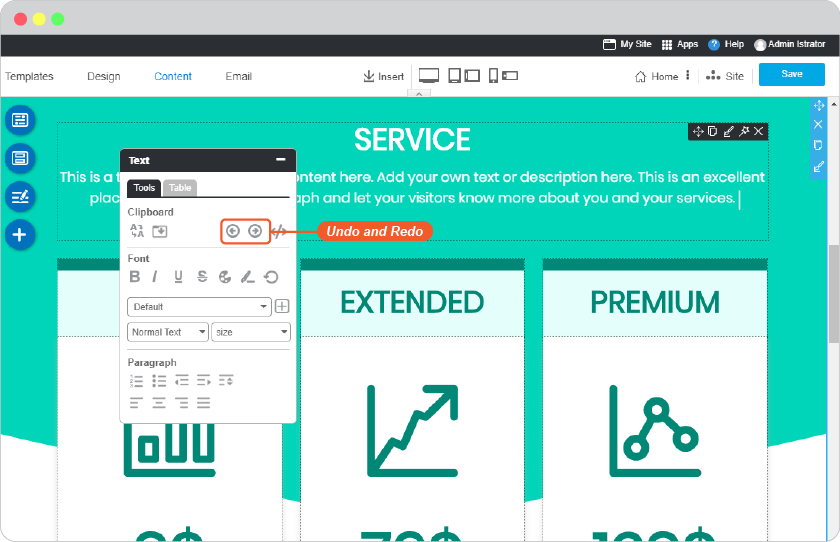
Undo and Redo
To reverse your last action and to reverse your last Undo.
HTML Mode
Insert HTML Code for each block. Please be careful to use the correct HTML code. As it will break an RVsitebuilder function, if your code doesn't use the correct syntax.

Font
Bold, Italic, Underline, Strikethrough
Add text to Bold, Italic, Underline, Strikethrough.

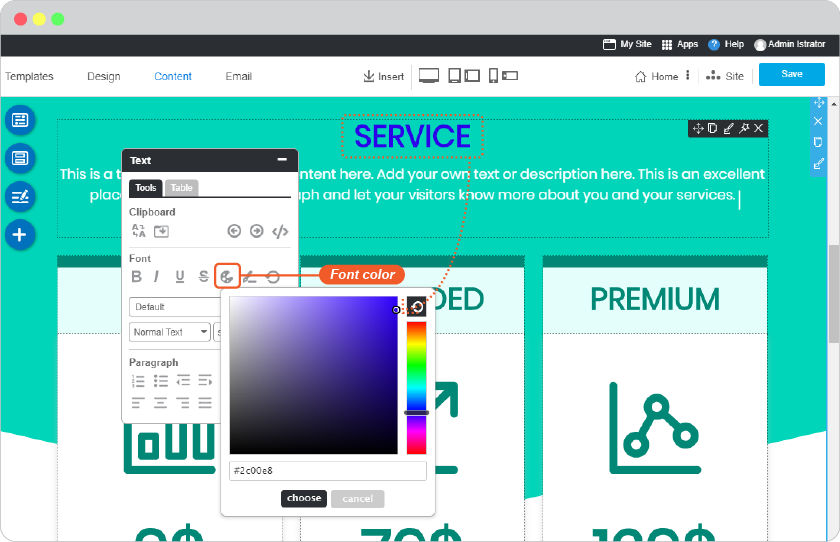
Font Color
Apply color to font by using our color picker or you can type a color code for the specific color.
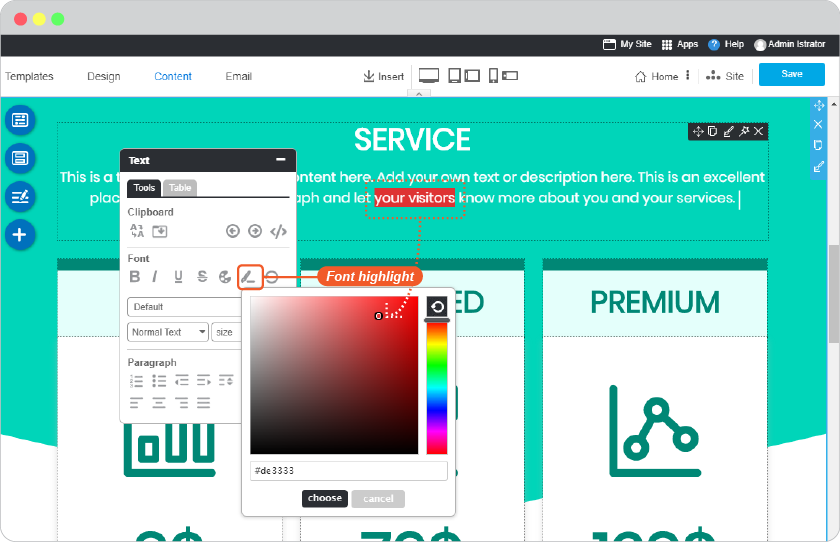
Font Highlight
Hover the text and choose the colot to highlight.
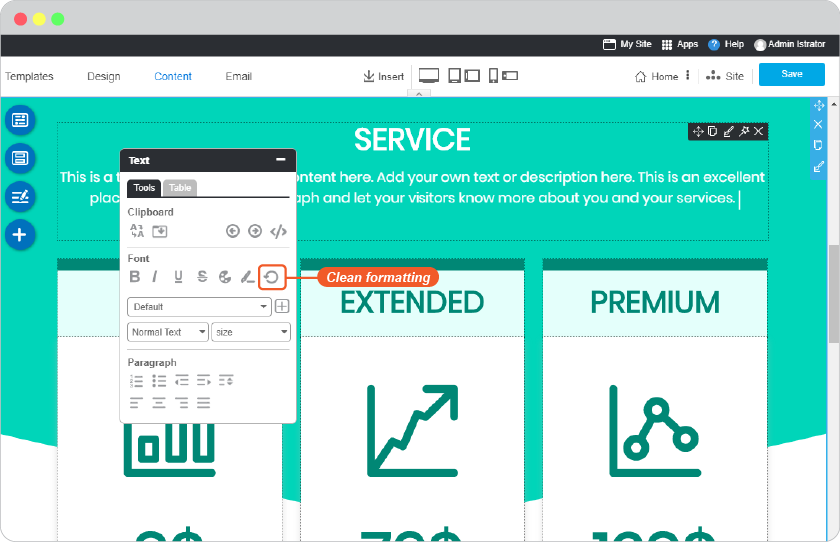
Clean formatting
Clearing text format, in case you copy the text from another website.
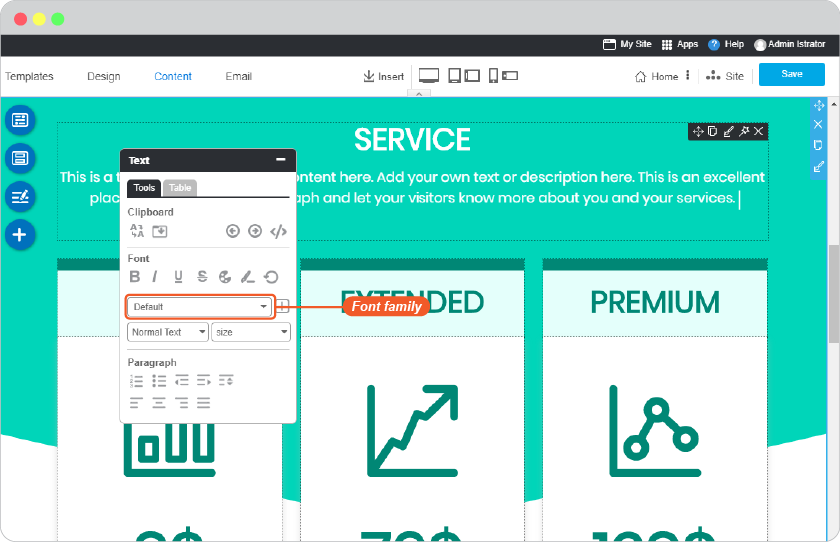
Font Family
Select font family from the drop-down list and you can use our new feature to add more font family from Google Font as well!
Add font family from Google Font
-
Choose a font at Google Font.
-
On Text tool, click "+" button next to font family.

-
Fill a font name and click Add.
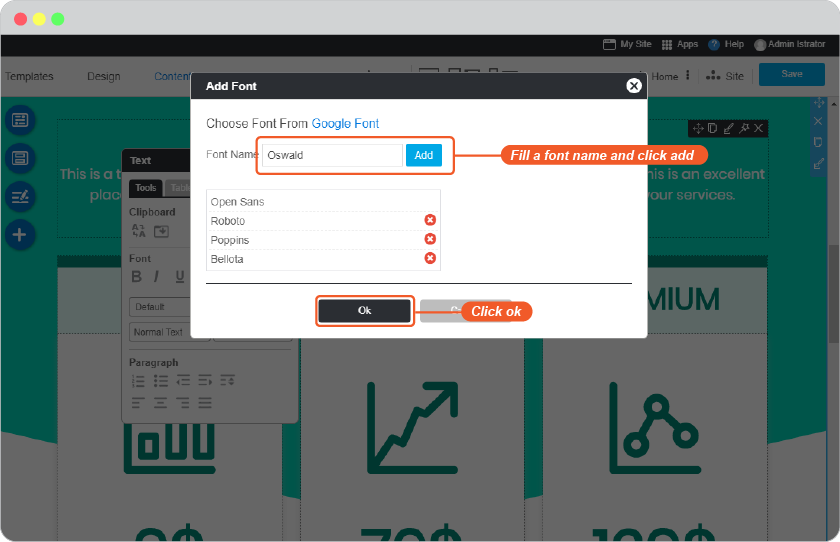
-
You can select a new font from font list.

Tips: You can add a miximum 5 font families.
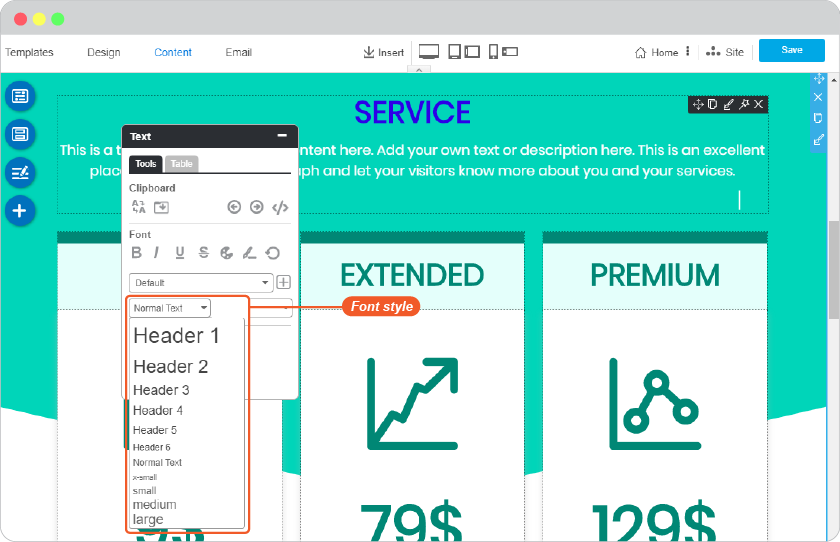
Font Style
Font style creates the basic text structure, helping you organize thoughts on a page. You can apply style to text while you’re editing or adding it. Selecting 11 stlyes on the drop-down list to control the typography (font design), giving the words personality and flare.
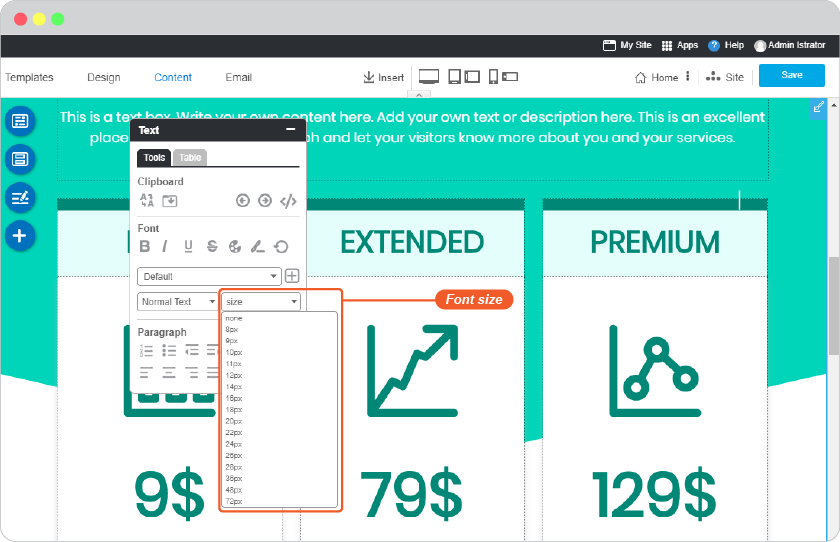
Font Size
Increase or decrease font size by choosing on the drop-down list.
Paragraph
Insert Number
Add list by numbered.

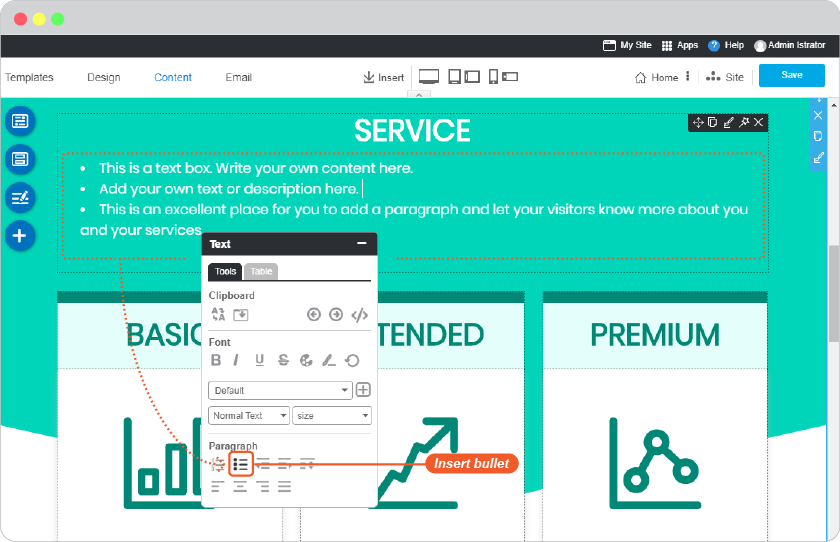
Insert bullet
Add content to list by bulleted list icons.
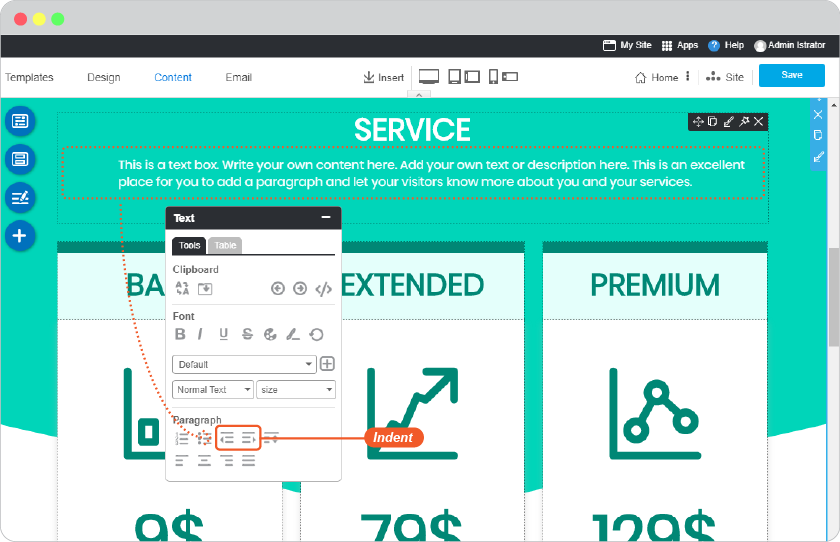
Indent
In the Text tool, click the increase or decrease indent icons to indent text to the left or right.
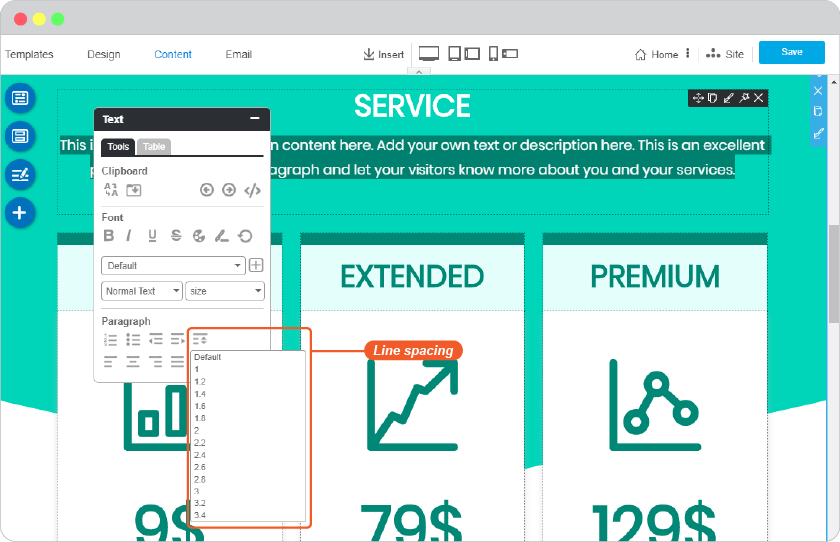
Line Spacing
Change the space between lines.
Alignment
Align your text paragraph; left, center, right and justify.
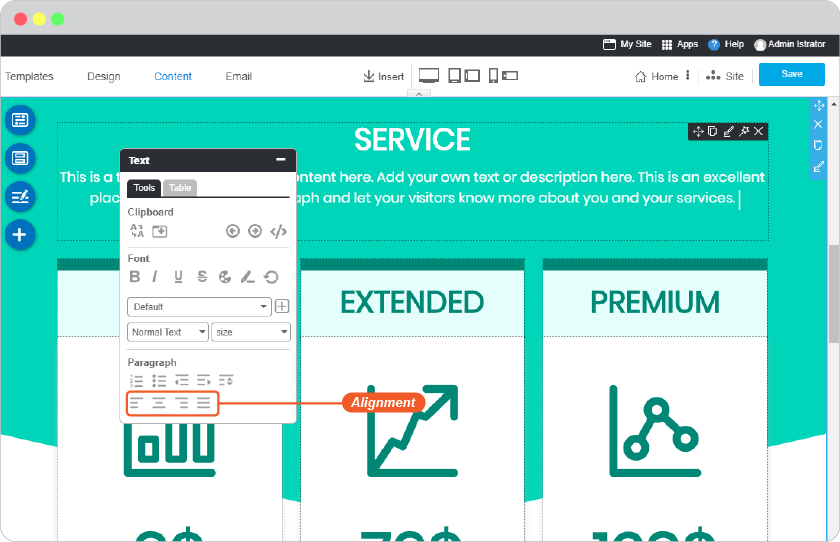
Table Tools
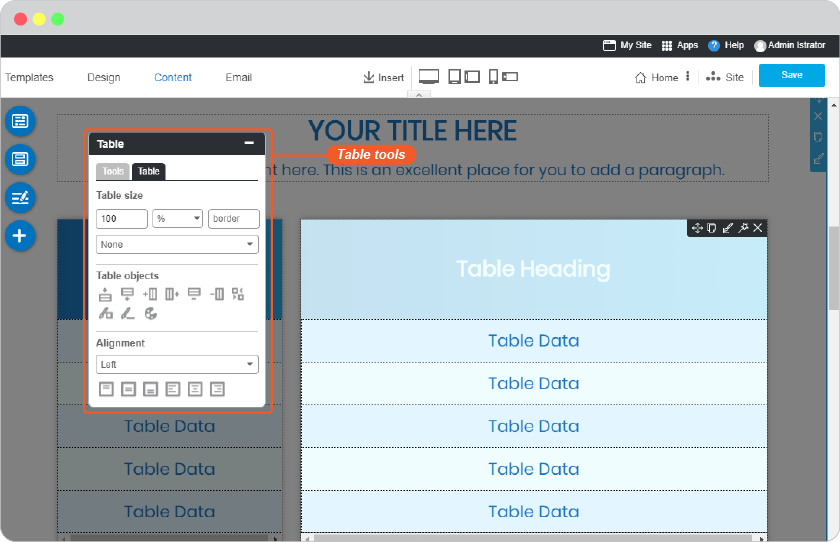
Table Size
Adjust the table and boarder size, also select the boarder style on the drop-down list. You can choose a table unit size between percentage and pixel.
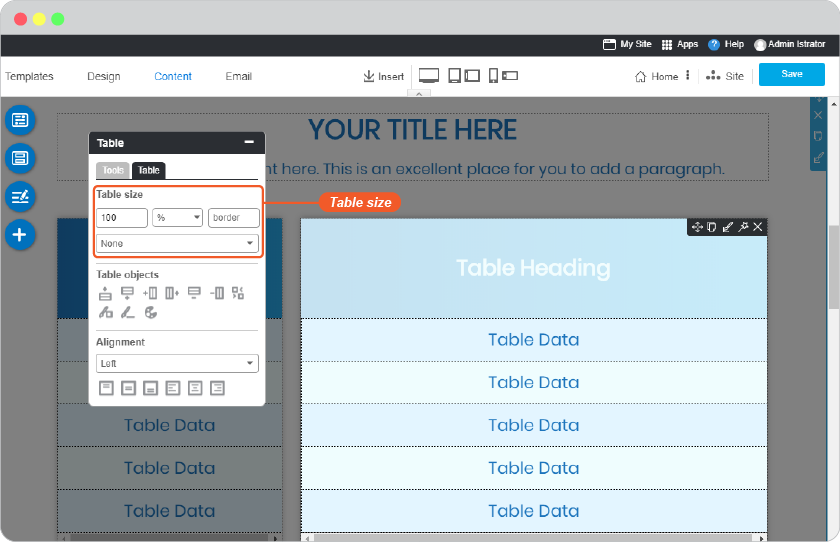
Table object
To Insert, merge, remove both row and column.
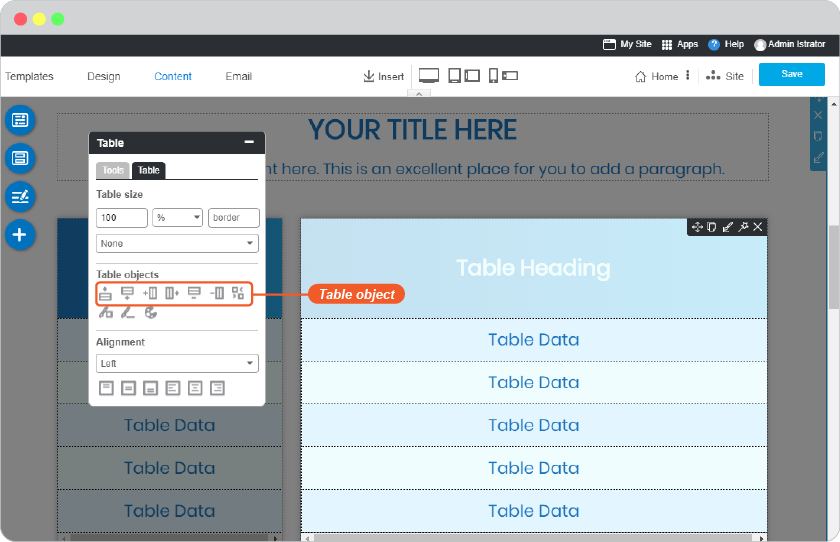
Table Color
Adjust the color on each cell or the whole table and table border color.
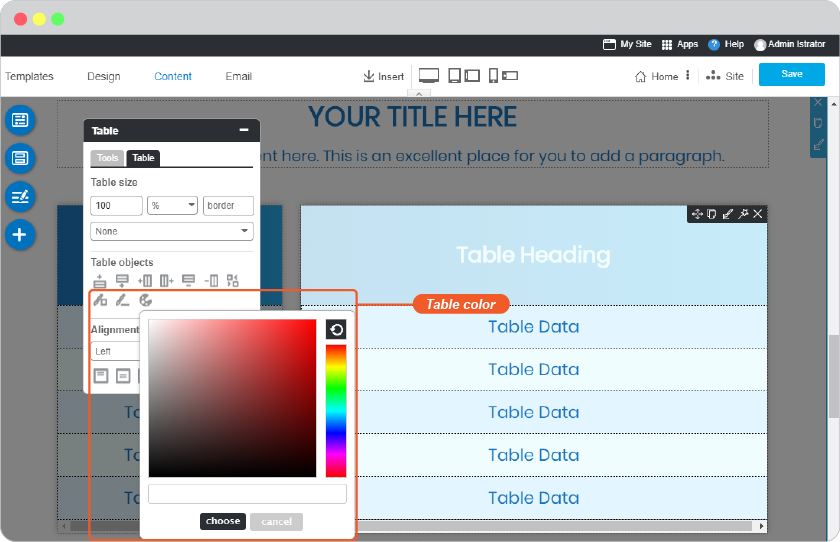
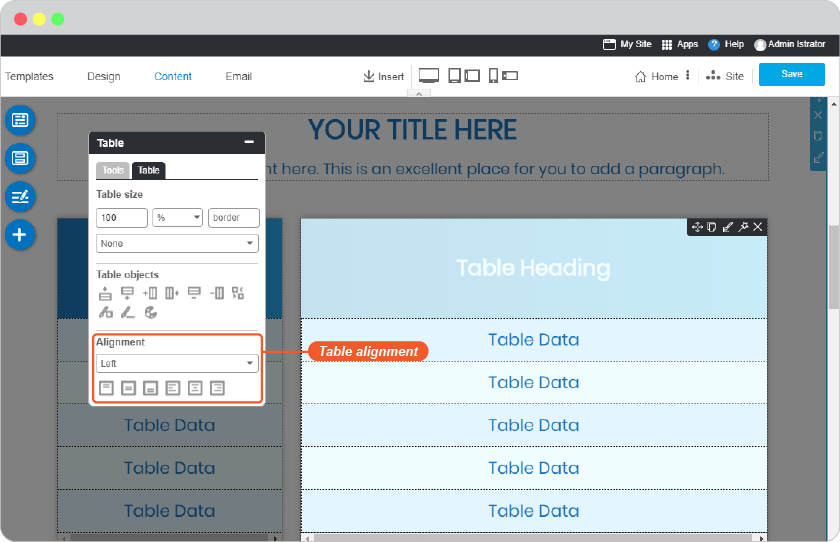
Table Alignment
Align text on the table both horizontal and verticle.
Content area design
Add new content section

On step Content, you can select a Section by drag and drop on the editor area. We provide 12 catagories section. In all 200+ layout designs, 130 designs are new from RVsitebuilder 7.
- Content: a normal section which contains a various layout.
- List: it allows you to add a group of product with descriptions and icons. It’s great for things like product descriptions, or can be used as a unique way to list the services you offer.
- Backgroud: It will present the almost ready content layout with cool text and picture positions with the beautiful background image from Background image album.
- Team: Showing your staff members including profile images, job positions, member names and so on.
- Pricing: If you run a business or sell a product on your website, you probably have a dedicated pricing page for the whole thing. You'll notice the best pricing pages have clean layouts, use simple language that speaks to the customer, and aim to inspire trust between the business and the user.
- Contact: The goal of every contact us page is to convert by clearly and effectively presenting the method(s) of getting in touch with a company as quickly as possible.
- Table: If you are presenting data and information using columns and rows, then these best table website templates are ideal for you. Tables are a super convenient way of displaying any sort of statistics, specifications and other whatnots. Instead of creating them from scratch, we built many different variations that are just a click away
- Video: One of the best ways to catch the eye of your website visitors is by showcasing your videos in a featured video section.
- Full screen: Full-screen mode takes advantage of your available screen real estate and provides a useful platform for presenting visual content. One main benefit of a full screen page layout is visibility.
- Social: Putting your social media channel on your website can directly affect the response and engagement from your visitor.
- Blank: Custom design a section by yourself. We provide a blank section with a variety block layout.
- Blog: Adding more widget on your page for letting a visitor can easily access to read your blog.
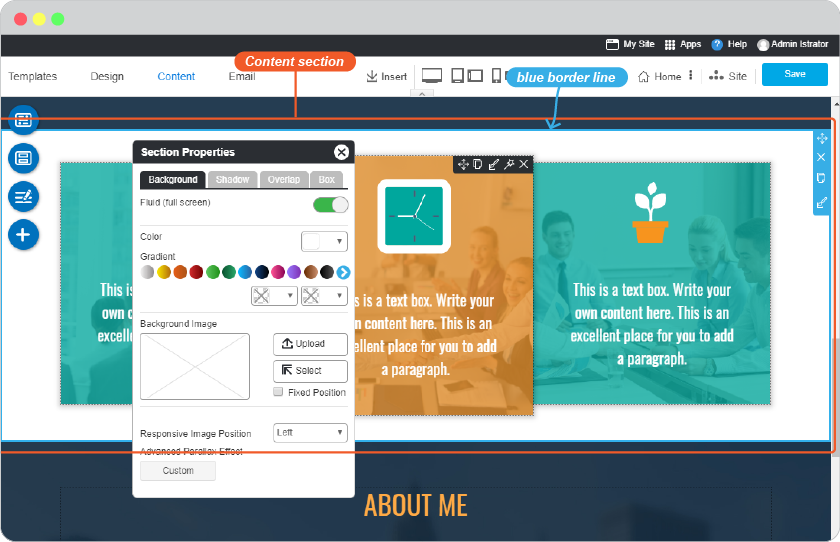
Content section design
Content section is the main content area you can easily see section by section inside blue border line. You can edit section background for more attracive content.
Edit section background
-
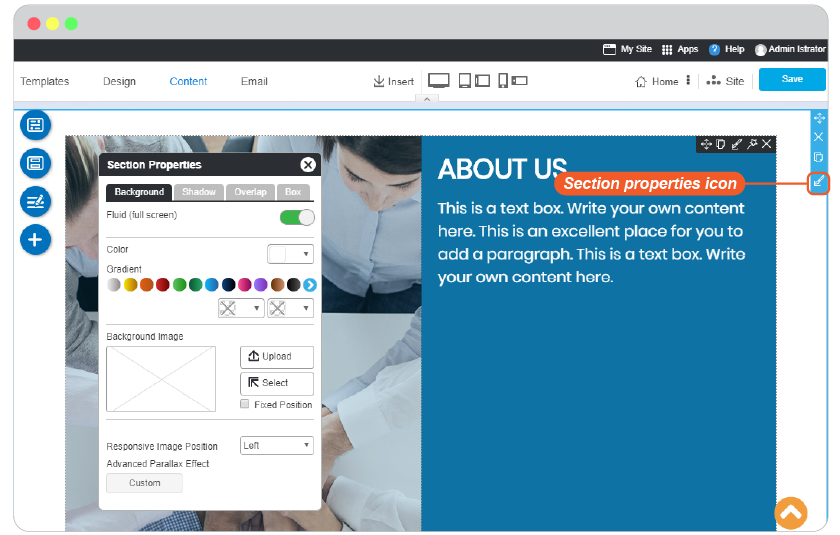
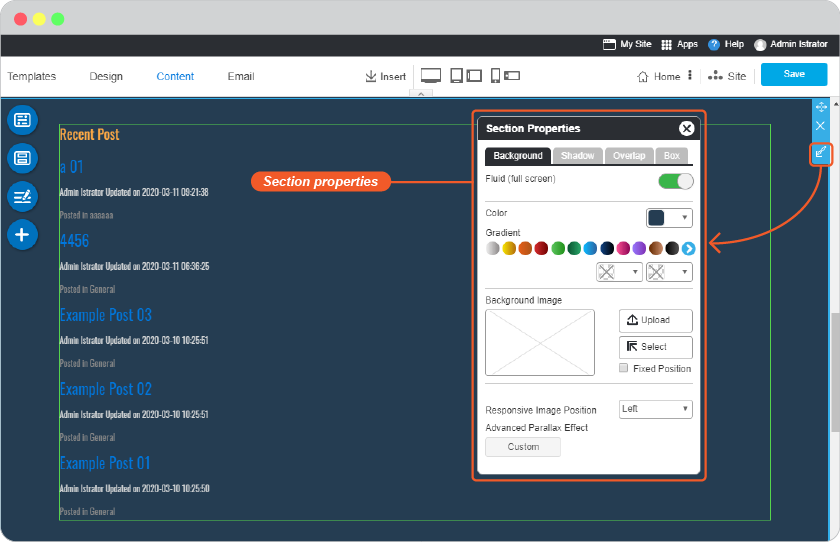
Click on the content section you want to edit. The blue border line will show its area.
-
Click Edit Section icon, and the Section Properties pops up which it allows you to change background image, set shadow, make section overlapping, and edit box border of this section.
-
Background
Fluid (full screen): Enable or disable a full screen section.
Color : Select background color by using color picker or choosing from a gradient color.
Background Image: You can upload your own image or select one from Image Manager.
Reponsive Image Position: Image alignment on responsive mode.
-
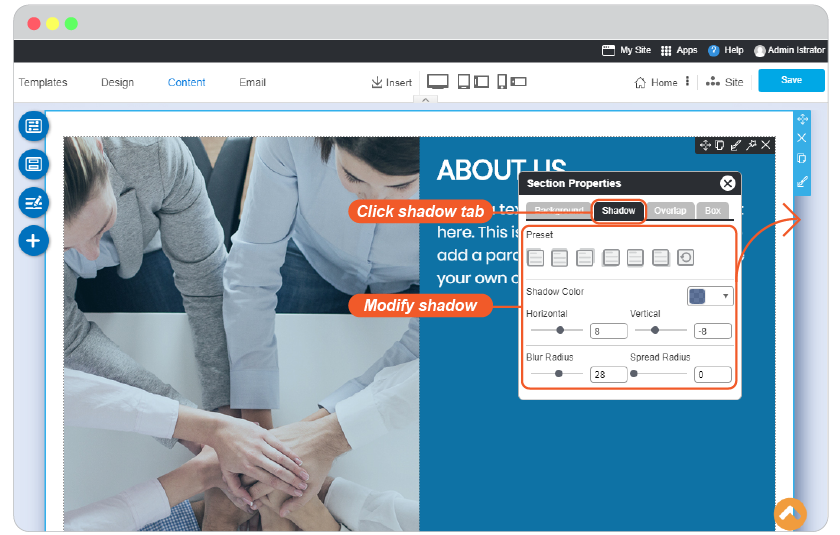
Shadow
You can select 6 shadow preset styles which you can modify color and size on the below setting.
-
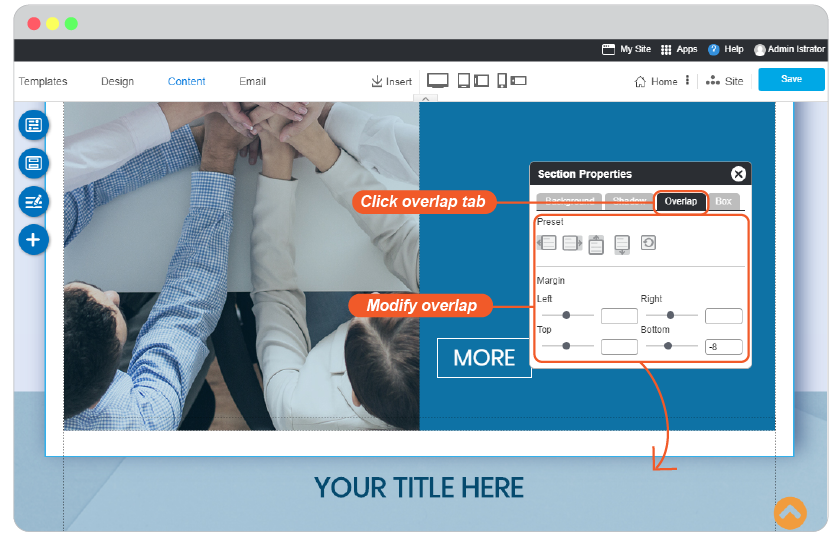
Overlap
You can make this section to overlap the above or below content section or being overlapped by them.
-
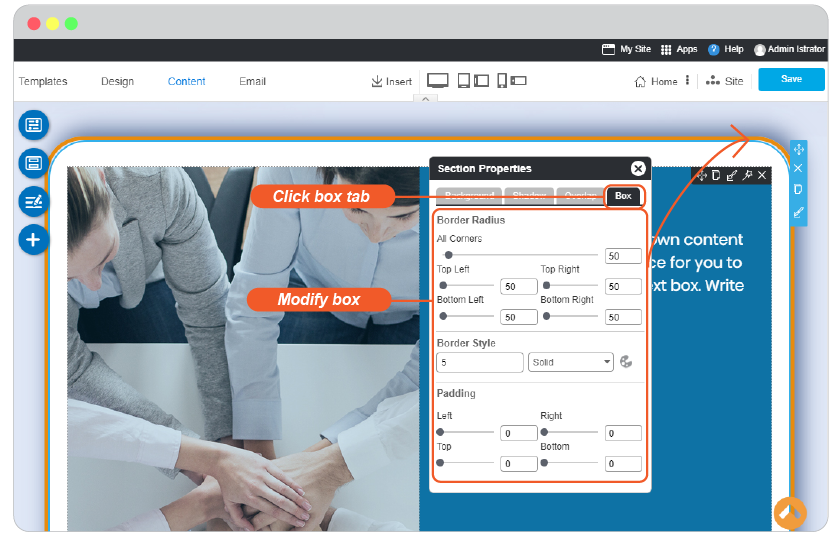
Box
Add and edit border of this section.
-
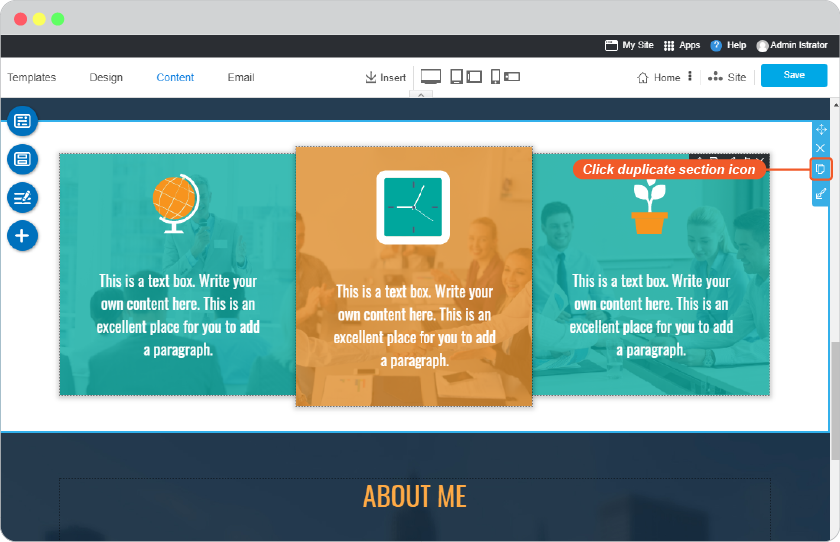
Duplicate section
You can duplciate section fore more faster content making if it's used the same design and content layout.
-
Click on the content section you want to edit. The blue border line will show its area.
-
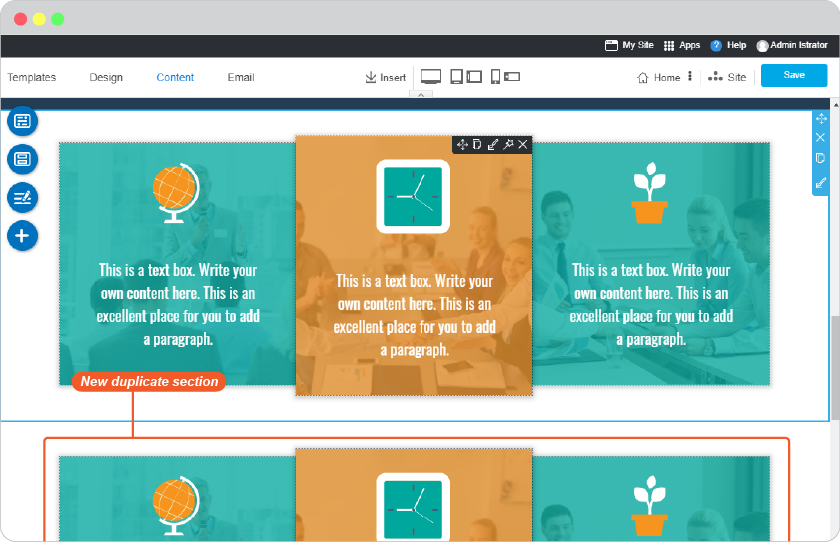
Click Duplicate Section icon. The new section will be duplicated below this section you selected.
-
You can start edit this duplicated section, it will not overwrite content and design in the original one.
Move section
You can use Move tool to freely move content section by drag and drop.
![]()
Remove section
CANNOT UNDO You can remove section if it's unwanted. But be careful and sure you want to remove it, it cannot be undo. If you accidently press Remove Section icon DO NOT click main Save button (the blue Save button on the top right), just refresh this page, then the remove didn't save and take no effect.
![]()
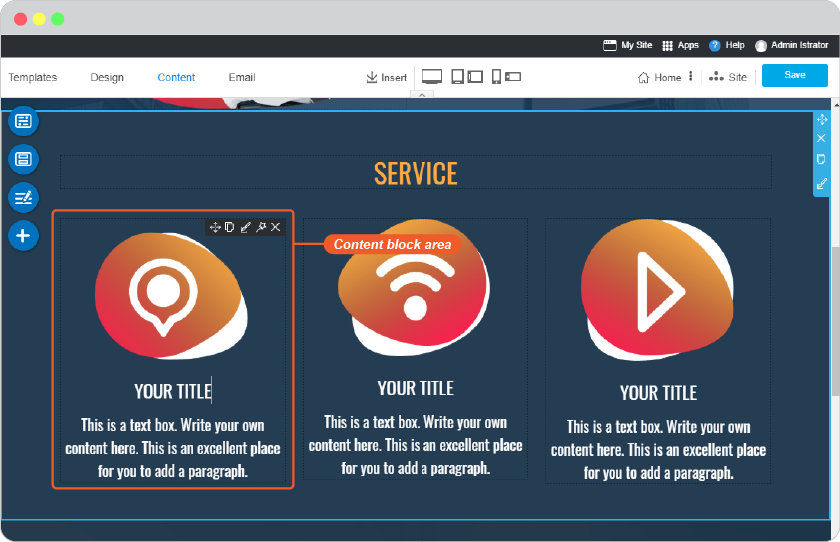
Content block design
Content block is sub content areas inside content section that you can see they have their own tools appears while you're editing on each of them.
Edit block background
-
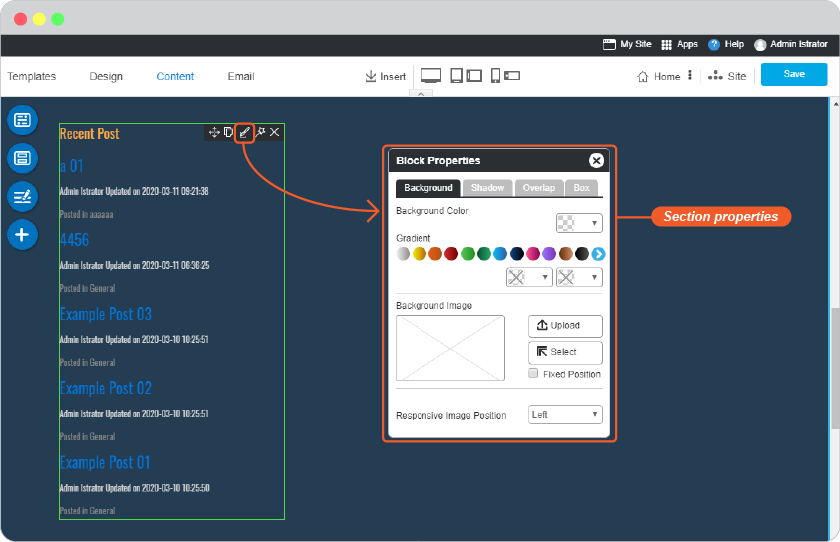
Click on the content block you want to edit. The tools will show to edit this block.
-
Click Edit Block icon, and the Block Properties pops up which it allows you to change background image, set shadow, make section overlapping, and edit box border of this block.
-
Background
Background Color : Select background color by using color picker or choosing from a gradient color.
Background Image: You can upload your own image or select one from Image Manager.
Reponsive Image Position: Image alignment on responsive mode.
-
Shadow
You can select 6 shadow preset styles which you can modify color and size on the below setting.
-
Overlap
You can make this block to overlap the above or below content block or being overlapped by them.
-
Box
Add and edit border of this block.
-
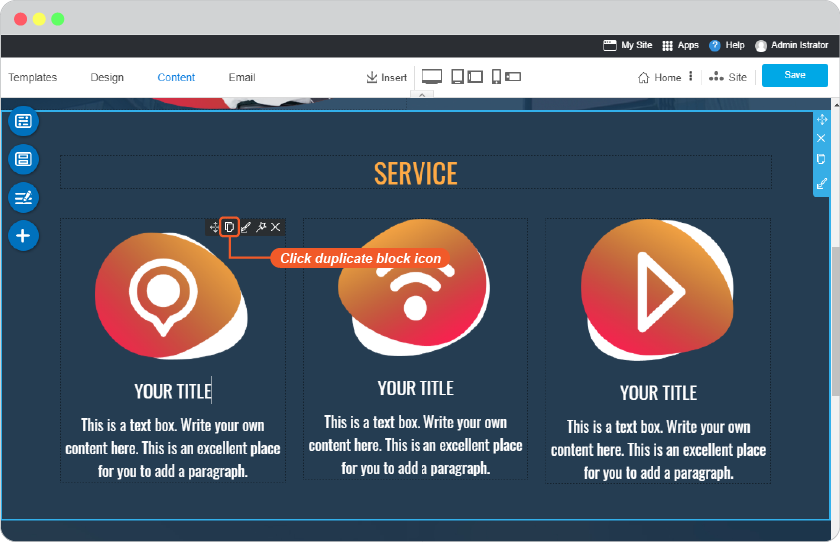
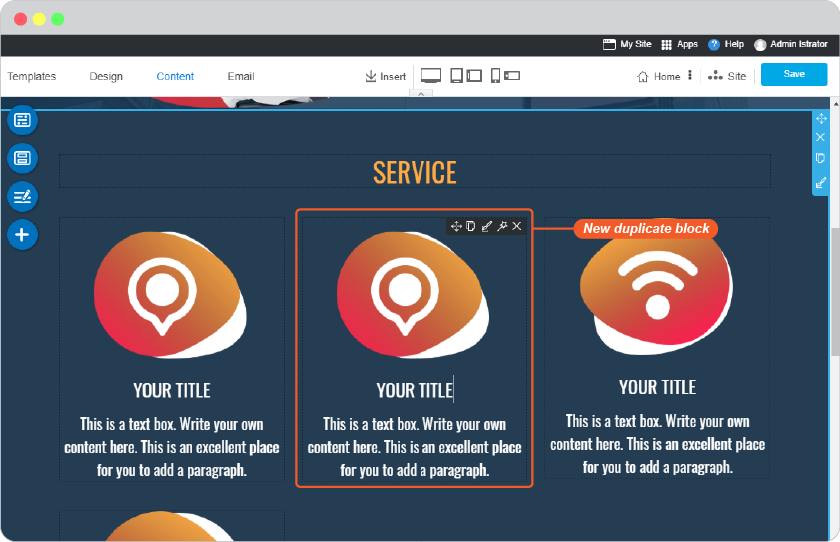
Duplicate block
You can duplciate section fore more faster content making if it's used the same design and content layout.
-
Click on the content block you want to edit. The tools will show to edit this block.
-
Click Duplicate Block icon. The new block will be duplicated next to this block you selected.
-
You can start edit this duplicated block, it will not overwrite content and design in the original one.
Move block
You can use Move block to freely move content block by drag and drop inside content section.
![]()
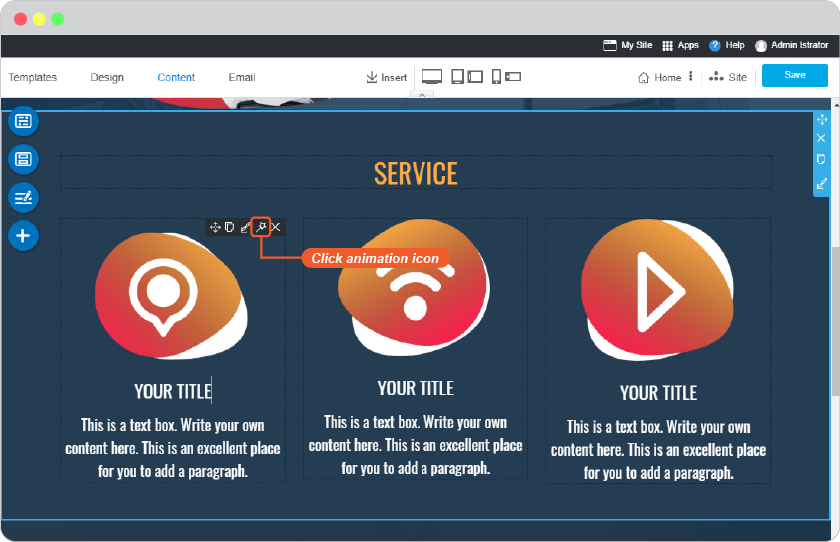
Add animation to block
You can make content block display animation effect for being more wow.
-
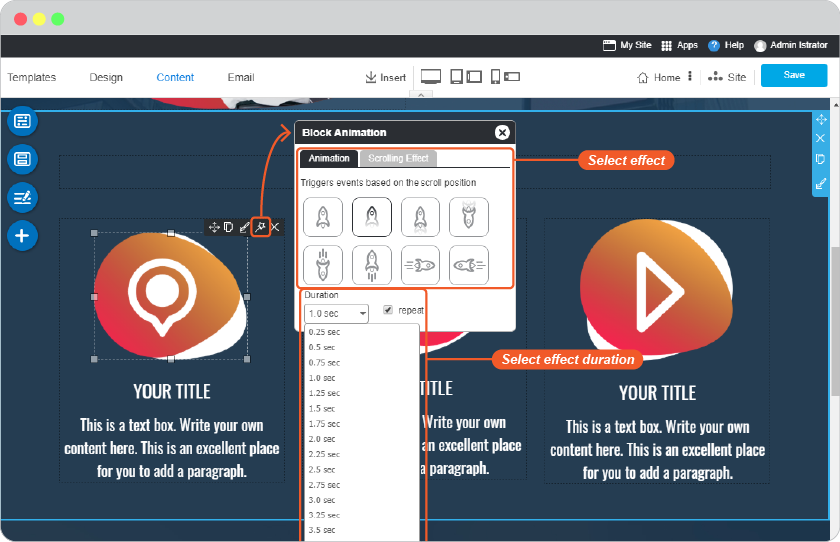
Click on the content block you want to edit. then click on Animation icon.
-
Select an effect for your content block and give it the moving duration in second.
Remove block
CANNOT UNDO You can remove block if it's unwanted. But be careful and sure you want to remove it, it cannot be undo. If you accidently press Remove Block icon DO NOT click main Save button (the blue Save button on the top right), just refresh this page, then the remove didn't save and take no effect.
![]()
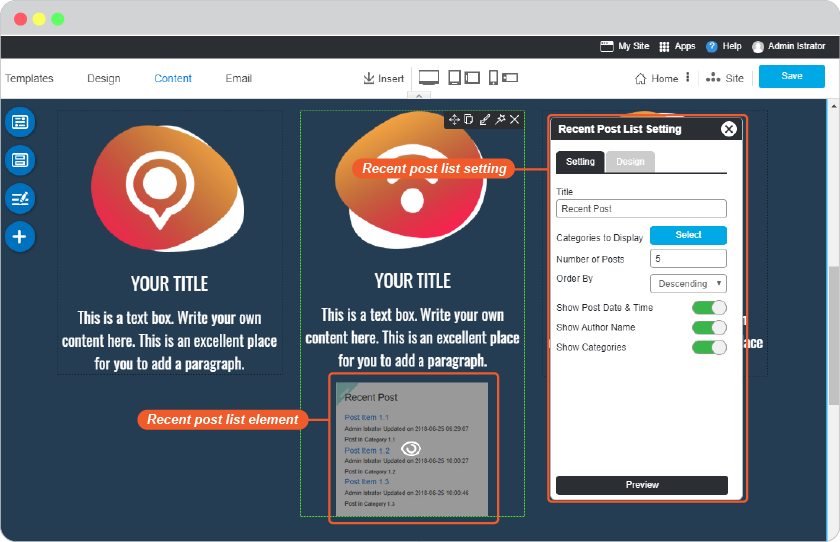
Insert blog widget
You can use Blog widget to insert your Blog Catagory List and Recent Post List among website content on the page you want for more connection and readers to your Blog.
3 ways to insert Blog widget for your Blog Catagory List or Recent Post List to content are; as Section, as Block and as element among the content.
-
As section
-
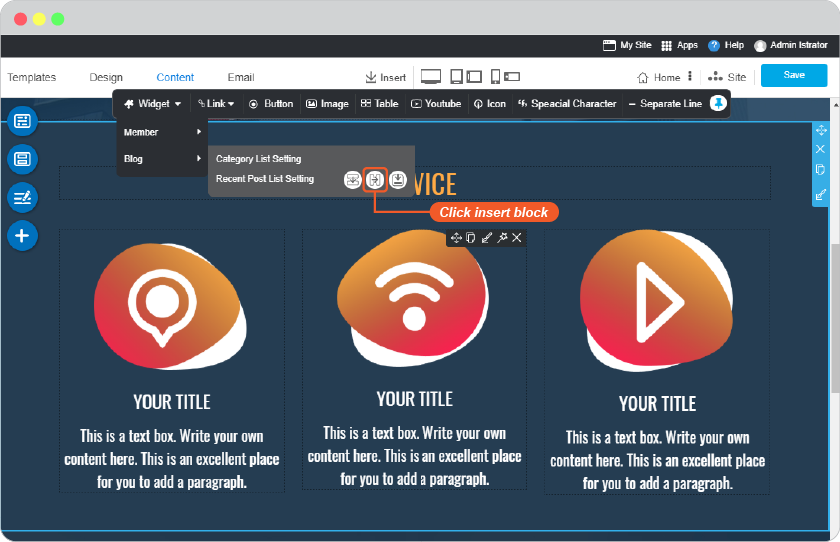
Place mouse on content section you want to insert Blog widget.
-
Use Insert tool, and Widget.
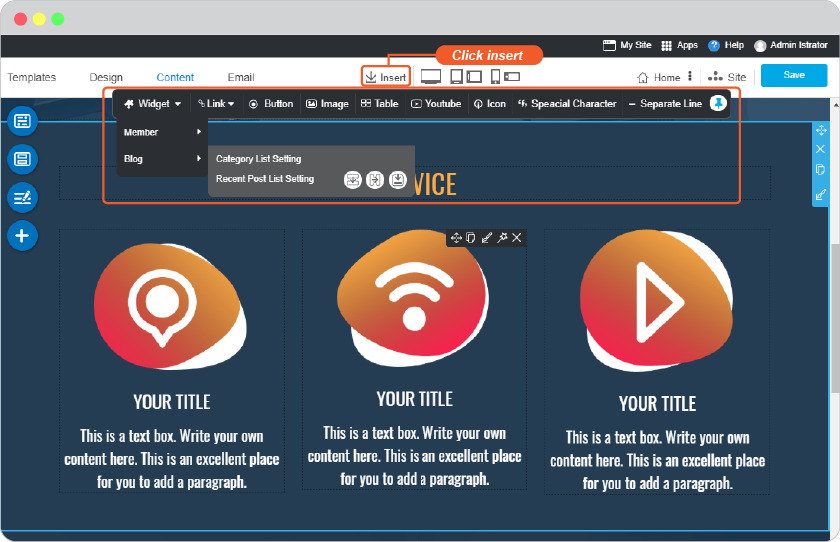
-
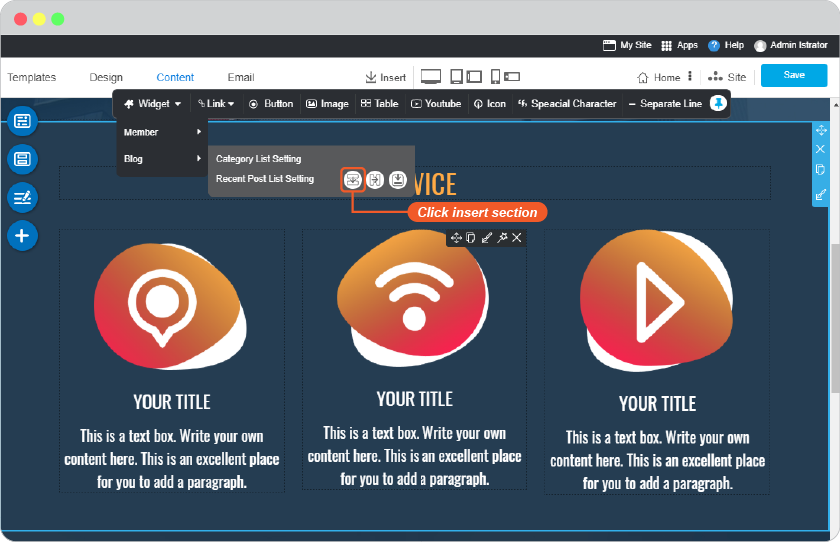
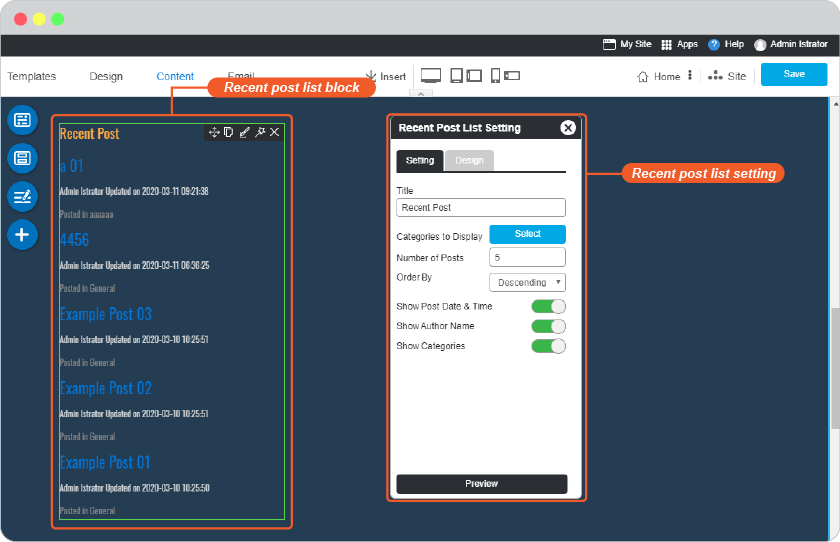
By hovering mouse on Blog widget, place to insert Blog Catagory List or Recent Post List, and select Insert Section.
-
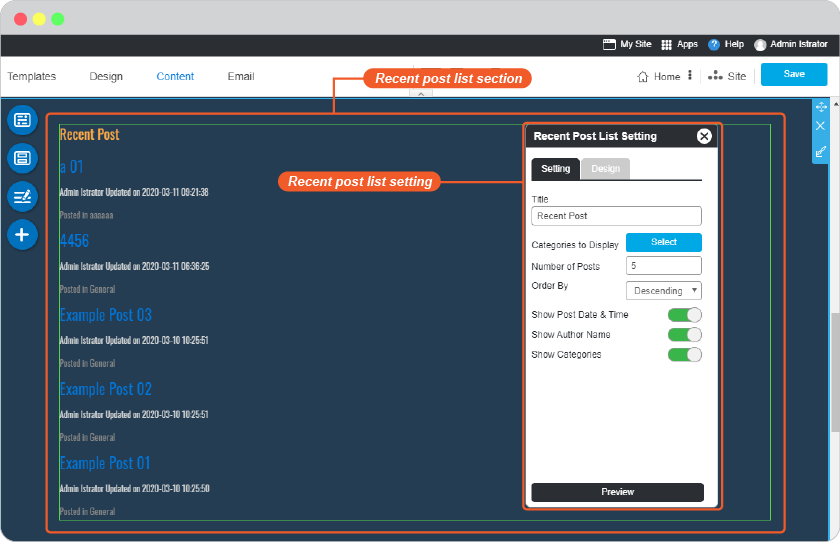
The inserted widget will be under the content section you clicked by number 1. You can edit how this list display and its design in the List Setting panel.
-
You can also edit section background the same way with section background of content.
-
-
As block
-
Place mouse on content block you want to insert Blog widget.
-
Use Insert tool, and Widget.
-
By hovering mouse on Blog widget, place to insert Blog Catagory List or Recent Post List, and select Insert Block.
-
The inserted widget will be next to content block you clicked by number 1. You can edit how this list display and its design in the List Setting panel.
-
You can also edit block background the same way with block background of content.
-
-
As element among the content
-
Place mouse on content area you want to insert Blog widget.
-
Use Insert tool, and Widget.
-
By hovering mouse on Blog widget, place to insert Blog Catagory List or Recent Post List, and select Insert Element.
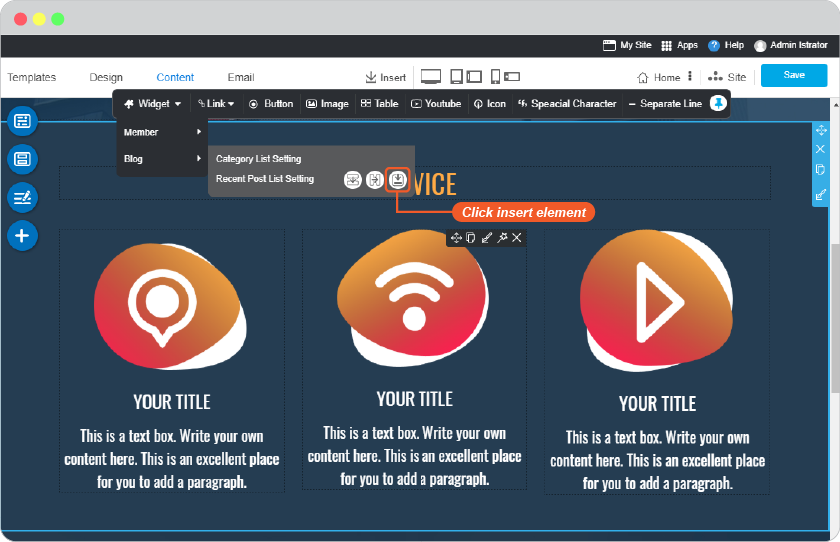
-
The inserted widget will be at the mouse position among the content you clicked by number 1. You can edit how this list display and its design in the List Setting panel.
-
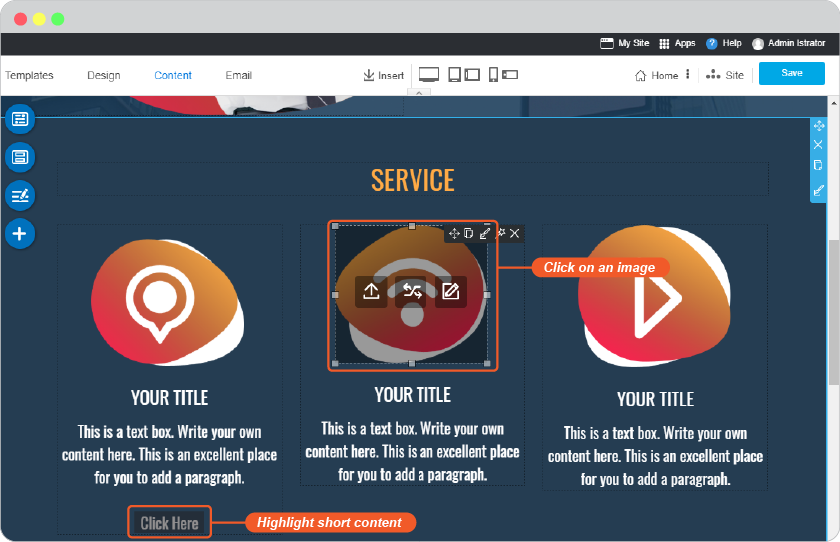
Insert link to content and image
You can insert connect link or hyperlink to your content and image by using Insert tool.

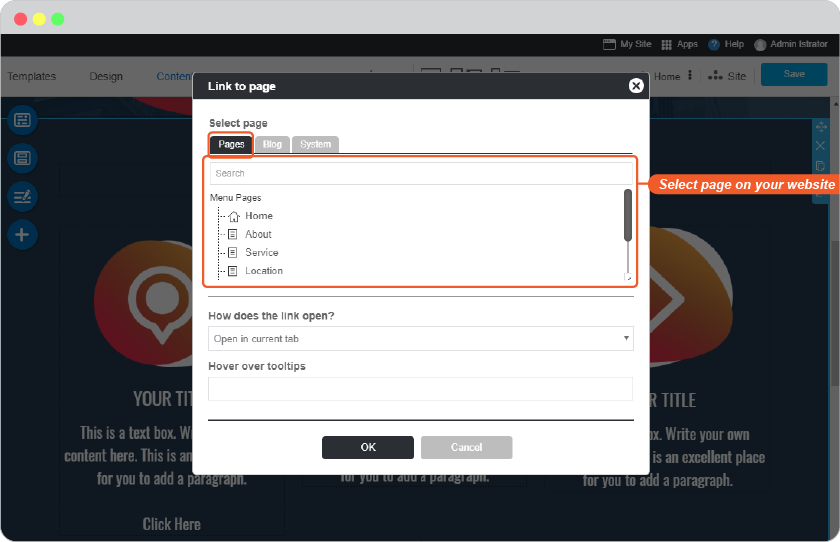
Insert page as link
-
Highlight short content or click on an image.
-
On Insert tool, place mouse on Link and select Page.

-
All 3 page types you can insert this content or image to link to.
-
Pages
You can link to any page on your website.
-
Blog
You can link to any blog post on your blog.

-
System
You can link to any system page on your website such as Login page, Register page, etc.

-
-
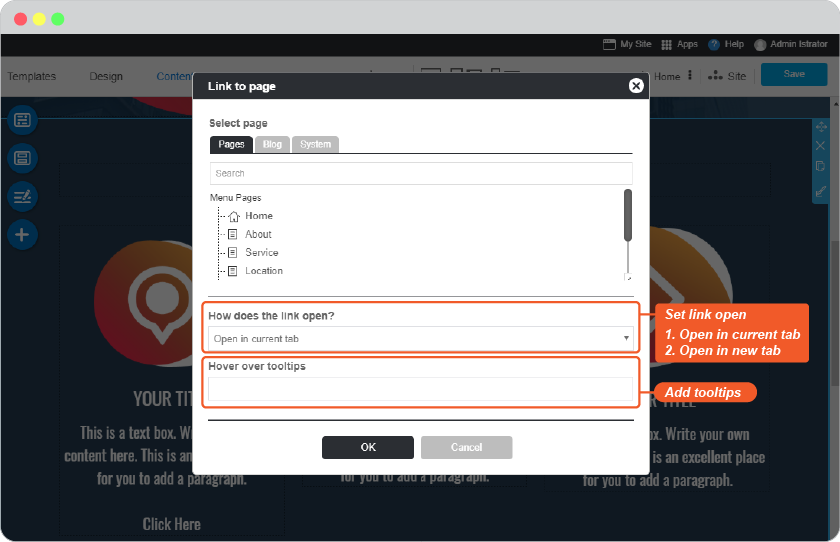
Set where link will be opened, and add the hover tooltips to display when mouse hover on it.
Insert website as link
-
Highlight short content or click on an image.
-
On Insert tool, place mouse on Link and select Website.
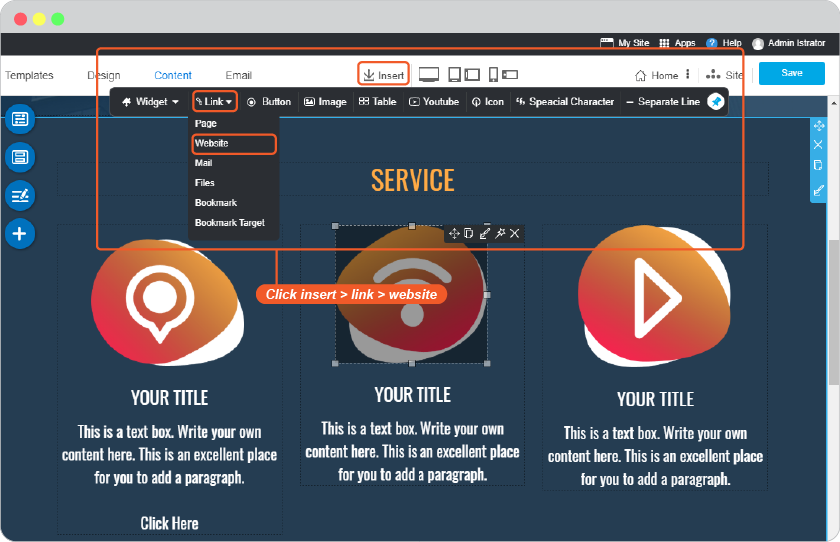
-
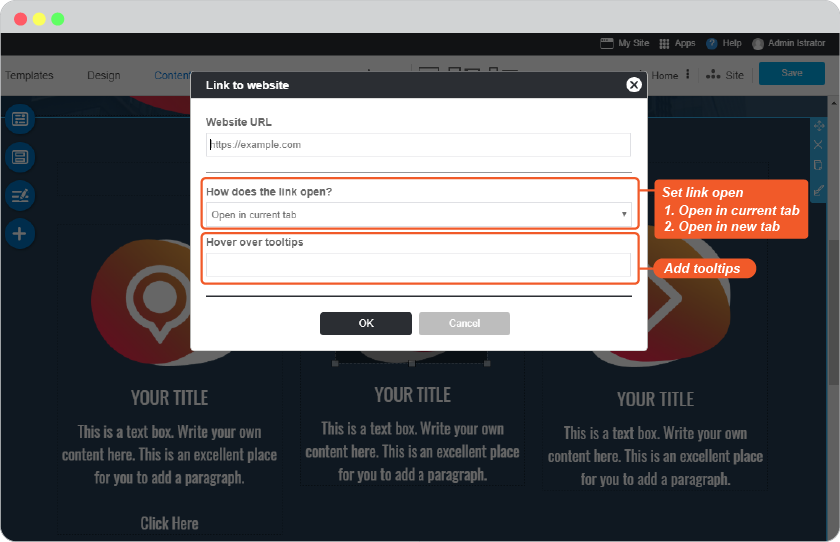
You can link to any website by inserting URL here.
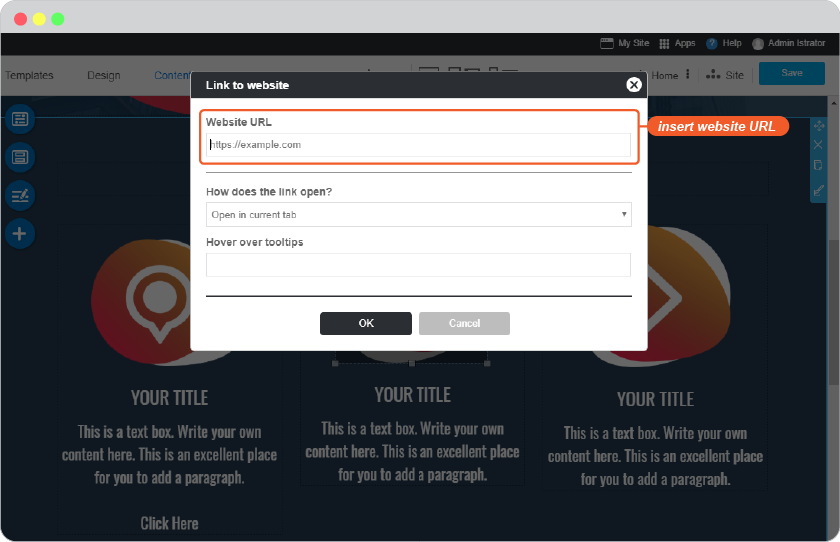
-
Set where link will be opened, and add the hover tooltips to display when mouse hover on it.
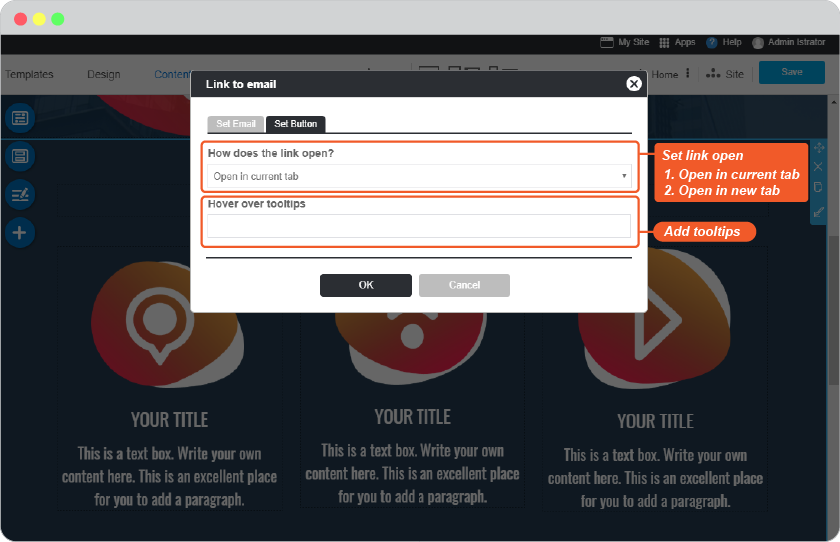
Insert send email as link
You can set the link to send email to you for more communication with your website visitors.
-
Highlight short content or click on an image.
-
On Insert tool, place mouse on Link and select Email.

-
On Set Email tab, add Email address, subject to let your visitor write message directly to you here.
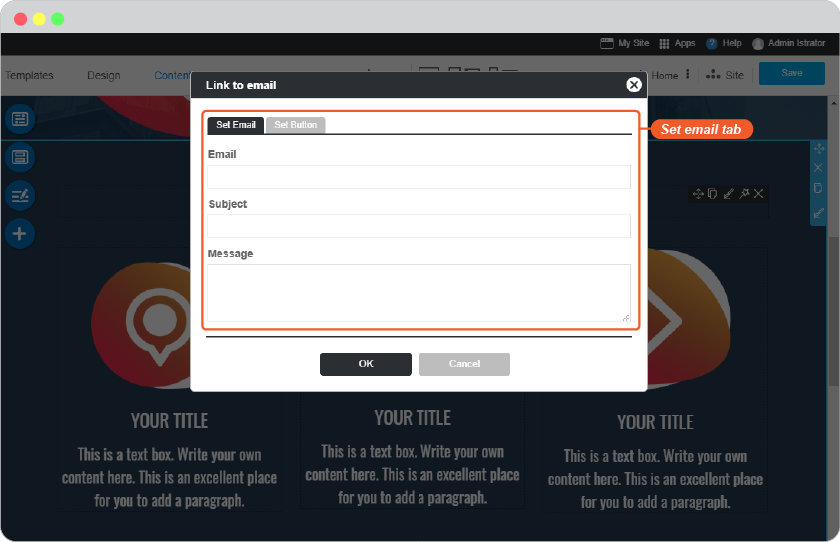
-
on Set Button tab, set where link will be opened, and add the hover tooltips to display when mouse hover on it.
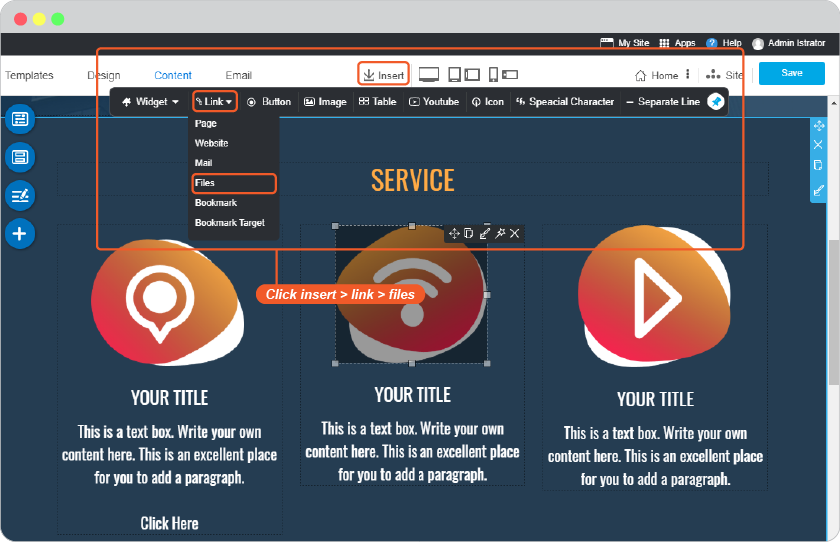
Insert file downloading as link
You can insert file to be donwloaded for your website visitors.
-
Highlight short content or click on an image.
-
On Insert tool, place mouse on Link and select Files.
-
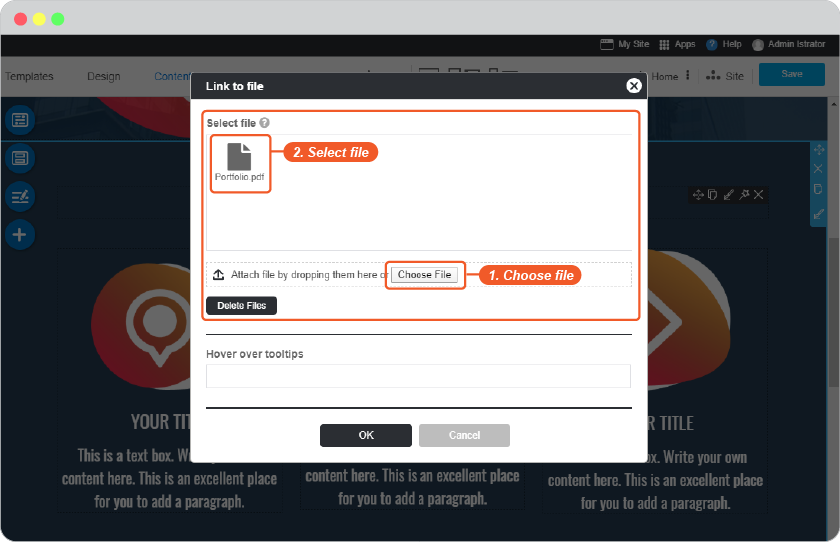
Choose File to upload, and select it from select field.
-
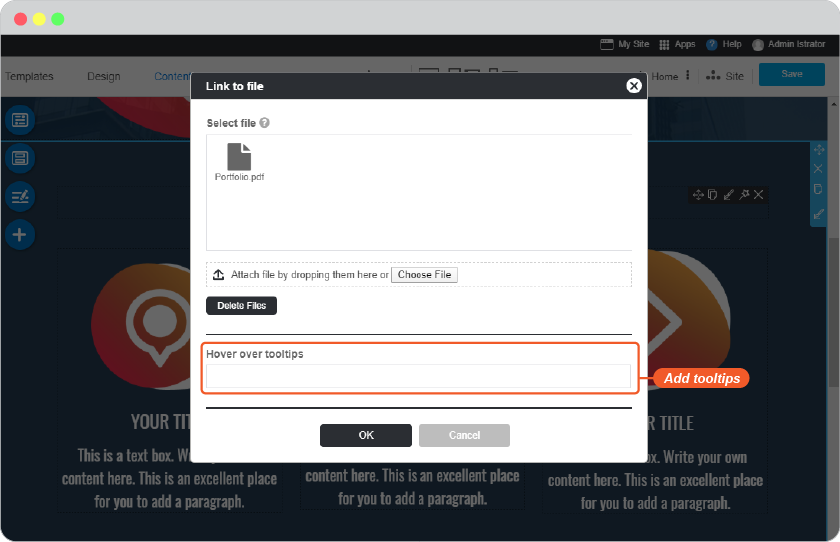
Set where hover tooltips to display when mouse hover on it.
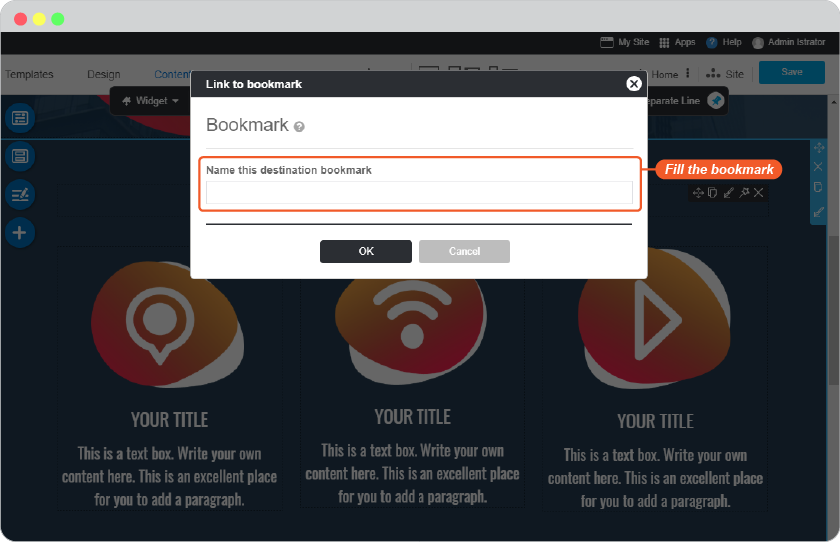
Insert bookmark as link
-
Set content to a bookmark
-
Highlight short content or click on an image.
-
On Insert tool, place mouse on Link and select Bookmark.
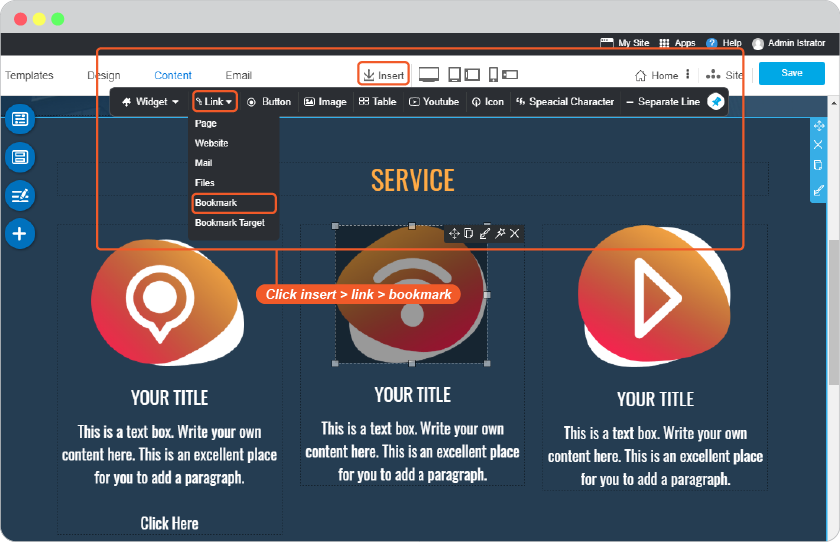
-
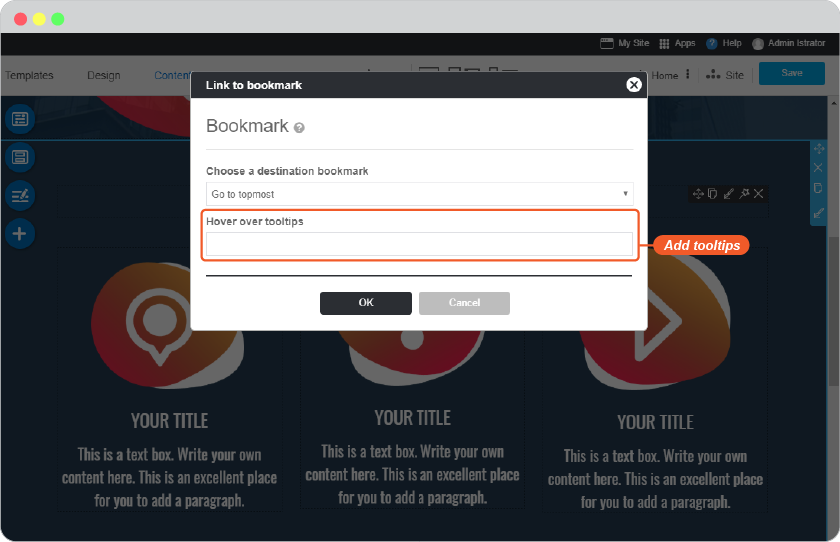
Choose a bookmark from dropdown list.
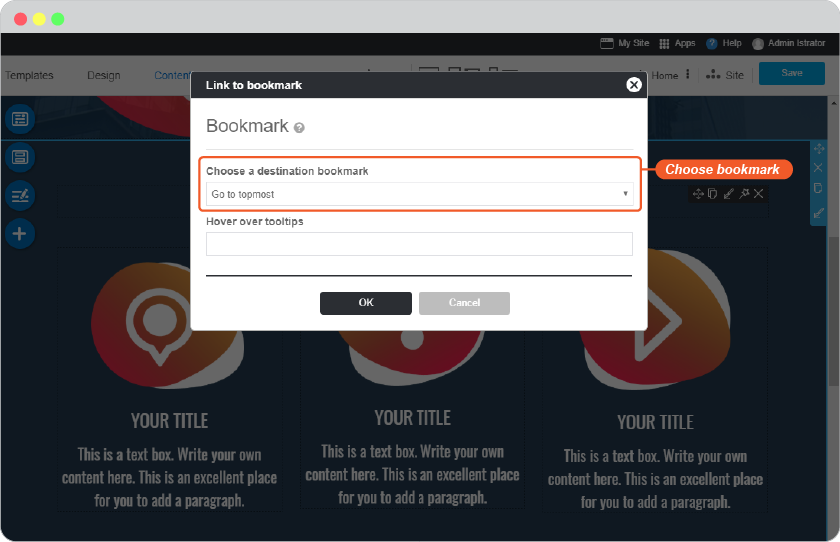
-
Set where hover tooltips to display when mouse hover on it.
-
-
Set content as bookmark target
-
Highlight short content or click on an image.
-
On Insert tool, place mouse on Link and select Bookmark Target.
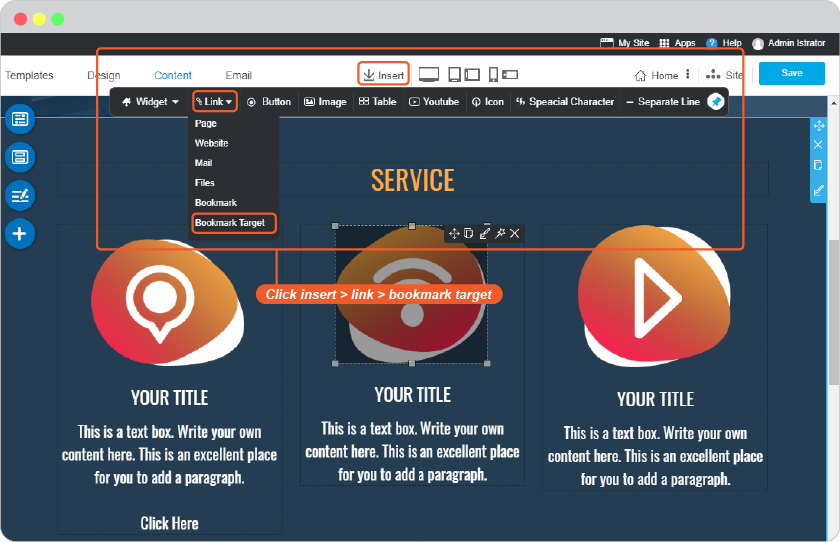
-
Name this bookmark target for selection purpose.
-
Insert button
Insert button
You can add button in content area for more connections.
-
At Content area, place mouse on position you want to insert button.
-
On Center menu, click "Insert" and select "Button".
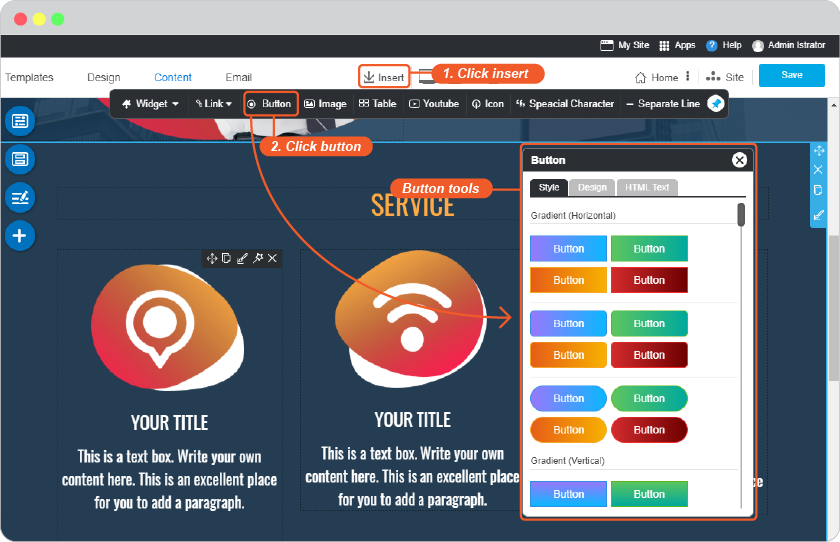
-
Select a design for your button.

-
Click on button itself for more setting such as set it linked to external website url.
Edit button
Click on the button to activate Button tools.
-
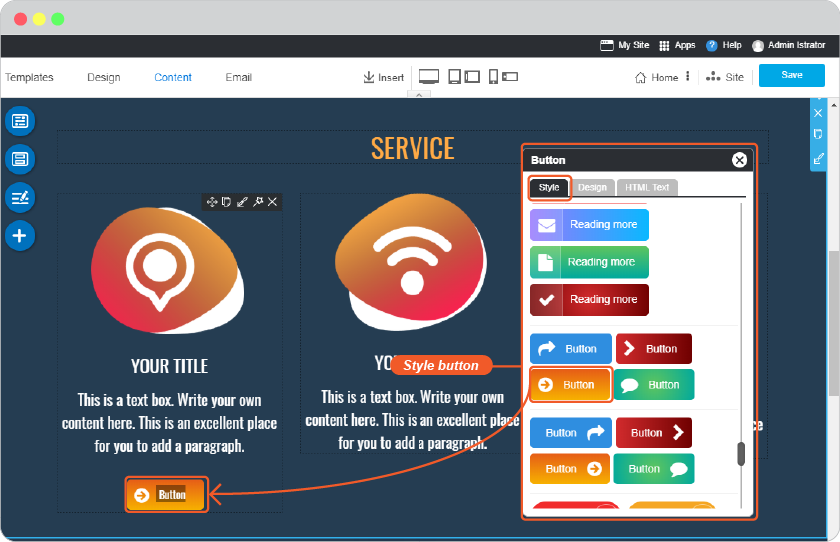
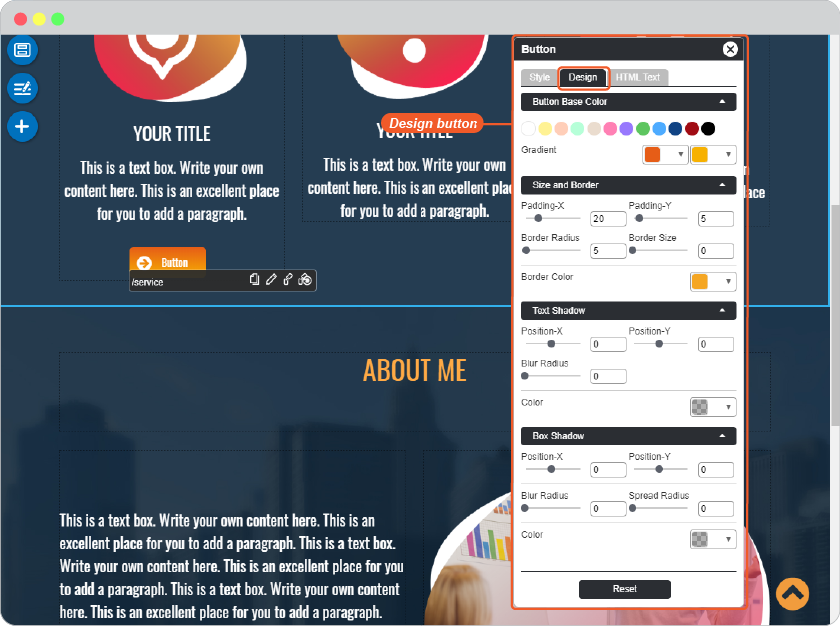
Edit button design
On the Button panel, you can edit button style as unique as you want.
-
Style
You can change button design from here again.
-
Design
You can also customize the button to be more unique and attractive.
Button Base Color : To customize the button color other than pre-installed designs
Size and Border : To edit size of the button, and the border of the button that you can add color to it.
Text Shadow : To add shadow and shadow color on the text in the button
Box Shadow : To add shadow and shadow color on the border of the button.
-
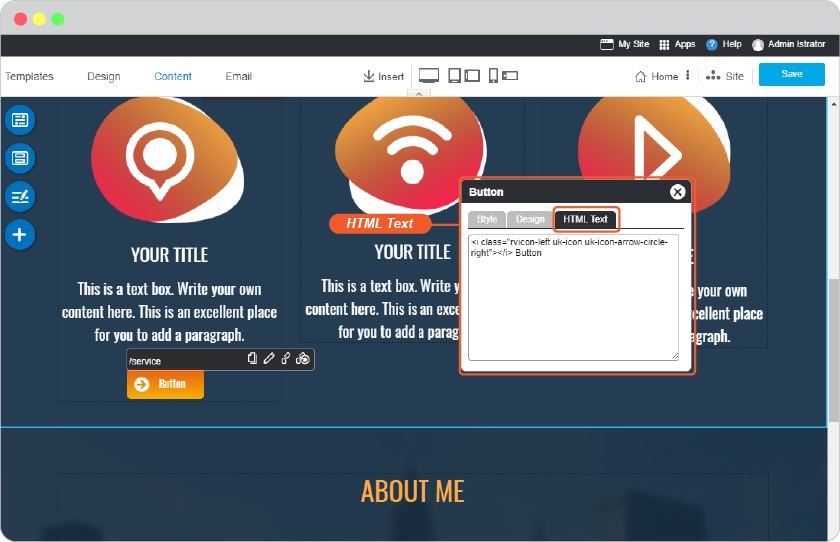
HTML Text
You can add HTML code on this button for more functional.
-
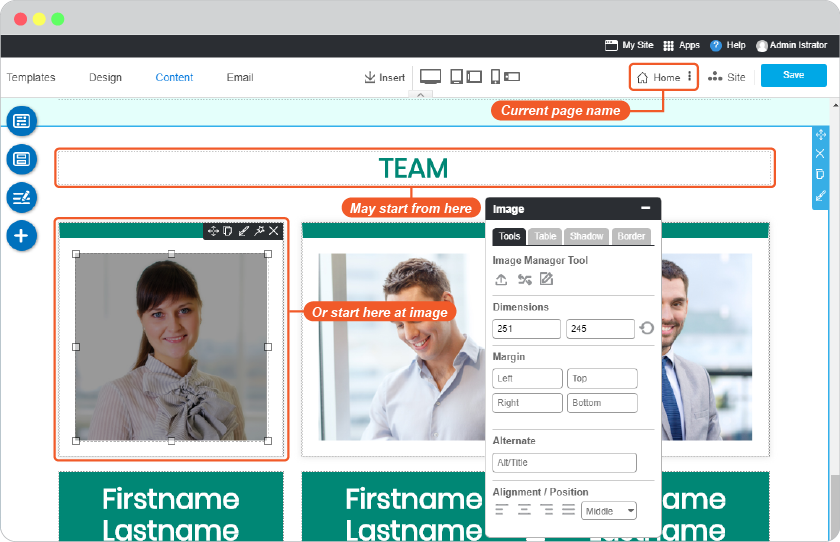
Insert image
Replace, Edit, Upload, Use image from facebook
Once some content done, let's make this page more interesting by adding images on it.
You can click directly on the image that comes with section.
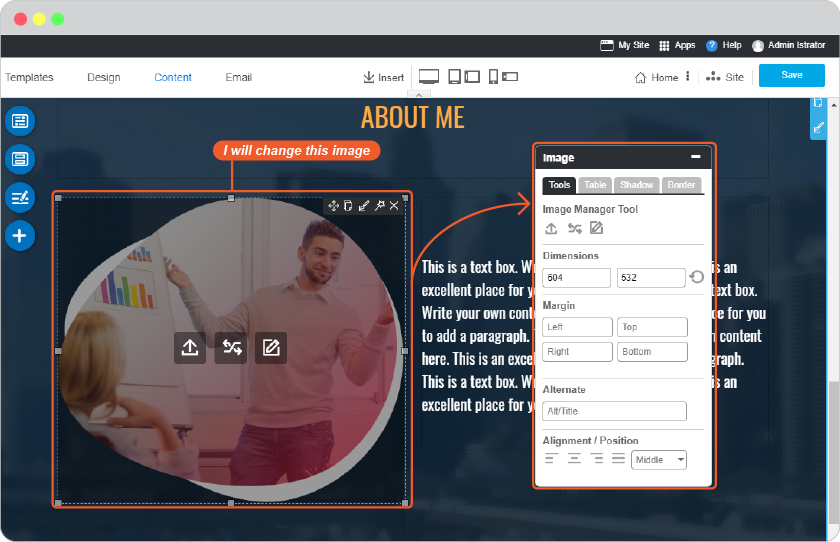
The 3 image tools are right on the image you clicked; Upload, Replace, and Edit respectively.

-
Upload
Click this icon, you will see the Upload Image window to upload an image from your computer. Simply upload it.
-
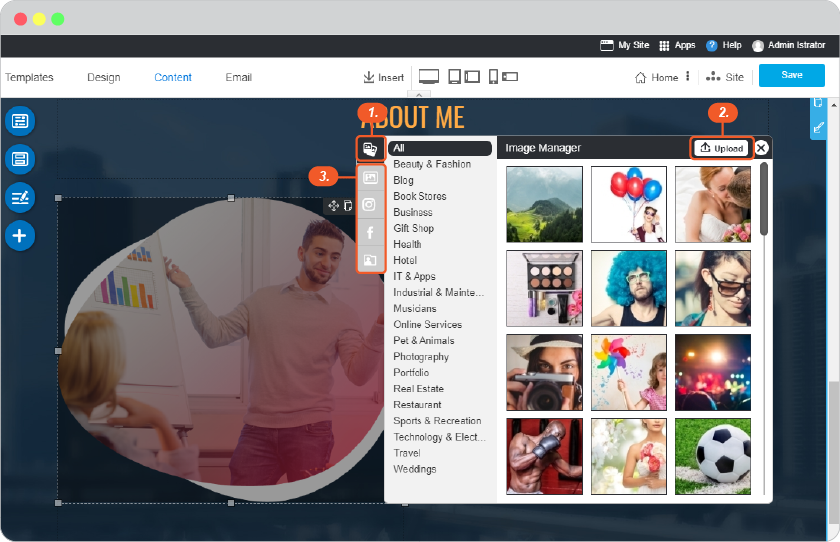
Replace
Click this icon and you will see the Image manager panel that has 3 main parts to manage image.
1) Image Manager panel ; Feel free to select one in free images from here.
2) Upload button ; Feel free to upload new image from your computer.
3) Other image folders ; folders to select images from such as our own buit-images, images from your Instagram or facebook accounts.
-
Edit
Click this button in order to edit this image.
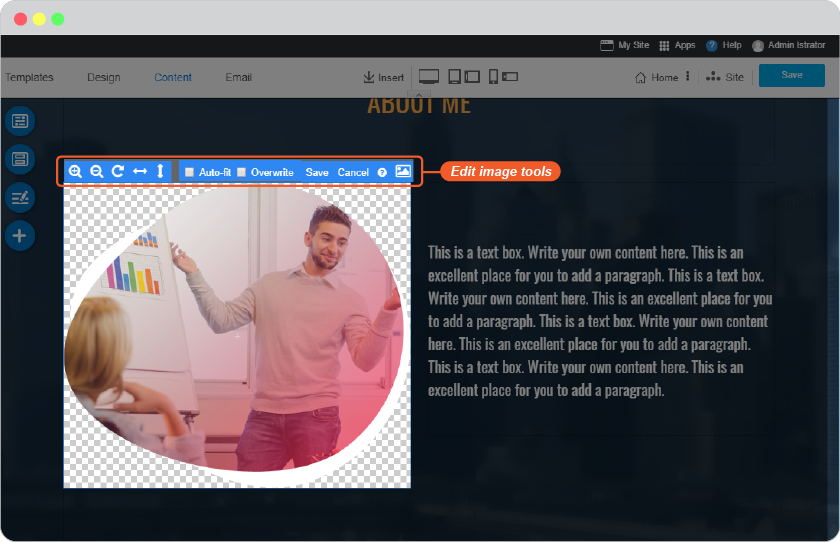
From left to right.
Zoom In : To Zoom this image for more closer.
Zoom Out : To make this image more farther but not farther than the original.
Rotate : To rotate this image.
Flip Horizontal : To make this image flipped horizontally.
Flip Vertical : To make this image flipped vertically.
Resize : To make this image size matched this image box. It's not to resize image freely.
Overwrite (Caution) : If you click Overwrite, it will entirely overwrite the original image by the new uploaded image. If you have the original image in any places of your website, it will be displayed the new uploaded image instead.
FULL image Editor : You can insert text, crop, rotation and add a filter. Make your image more beautiful ever!